
MovieFlo.AI Guide
Step 1 - Let's Start Creating!
Scripted Projects let you upload or write a script, automatically generate a visual storyboard, and turn it into a final video. This is MovieFlo’s core workflow for streamlining storytelling with precise creative control.
Click on the Scripted Project button.
Choose your Concept Source. You can choose from Develop Concept with AI or Upload Script or Brief. If you already have a script, you can upload it here to get started. (PDF and .txt files supported. Please note exceptionally long scripts over 70 pages may currently have issues). Note: When uploading a script many options below will vanish as they will be derived from your script. If you did, go ahead and skip directly to Step 6 - Create Your Actors otherwise, proceed down this list.
Choose your Story Type. All options can be overridden.
Custom will let you determine the story type as the creation process unfolds.
Short Film is pre-selected when choosing Scripted Projects.
Commercial/Ad option will bring up additional settings to add Ad Campaign Details. This is the same as “Create an Ad”.
Micro Drama will craft an episodic, vertical 9:16 format series in the traditional Hook-Point-Payoff-Hook cycle.
Style - You can upload an image to create your own style tag that will be used throughout your project, or you can choose from our pre-made styles including Realistic (16mm, 1970s Film, 1980s TV, Cyberpunk Neon-Noir, Documentary, Golden Hour) , Shonen Anime, Claymation, Modern Comic, and more. (Note: You can experiment and change styles in the Settings for each Story you create).
Output Target - Selecting an output target other than “General” will automatically change the Aspect Ratio and Duration for the specified target. Available choices include YouTube, instagram, Tiktok and more.
Choose your Format by first selecting your primary Aspect Ratio: 16:9 (Widescreen), 3:2 (Widescreen), 9:16 (Vertical), 2:3 (Vertical) or 1:1 (Square). Then, choose the Duration for the story (this is used as a target story length but can be adjusted during the creation process).
Default Models - These allow you to pre-select the default video, image and lip sync models. This can be changed at any time in the Settings or for each individual shot via a pulldown menu.
Story Structure - You can choose from AI Determined to let the AI decide what will work best for the project you create, Acts or Episodic.
Genre and Tone - Genre will define the overall style or category of your script. Tone will influence the mood and emotional impact of your script.
Scripted Project
Step 2 - Concept
Craft Your Story with the Co-Pilot
If you did not upload a script, you now will work with the MovieFlo.AI Co-Pilot “Flo” to craft your story and create a Synopsis, Scene Breakdown and then Script.
Describe Your Idea: In the "Concept" section, work with Flo and type out your initial story idea or concept. It can be as simple or complex as you like.
Go With The Flo: Next Flo will lead you through a series of questions to craft your actors, setting, plot points or product features for an Ad that you want to highlight. Pick from Flo’s suggestions, combine them, or add your own idea. It's up to you how much to use Flo’s suggestions at every step and how much input and detail you give it.
Step 3 - Synopsis
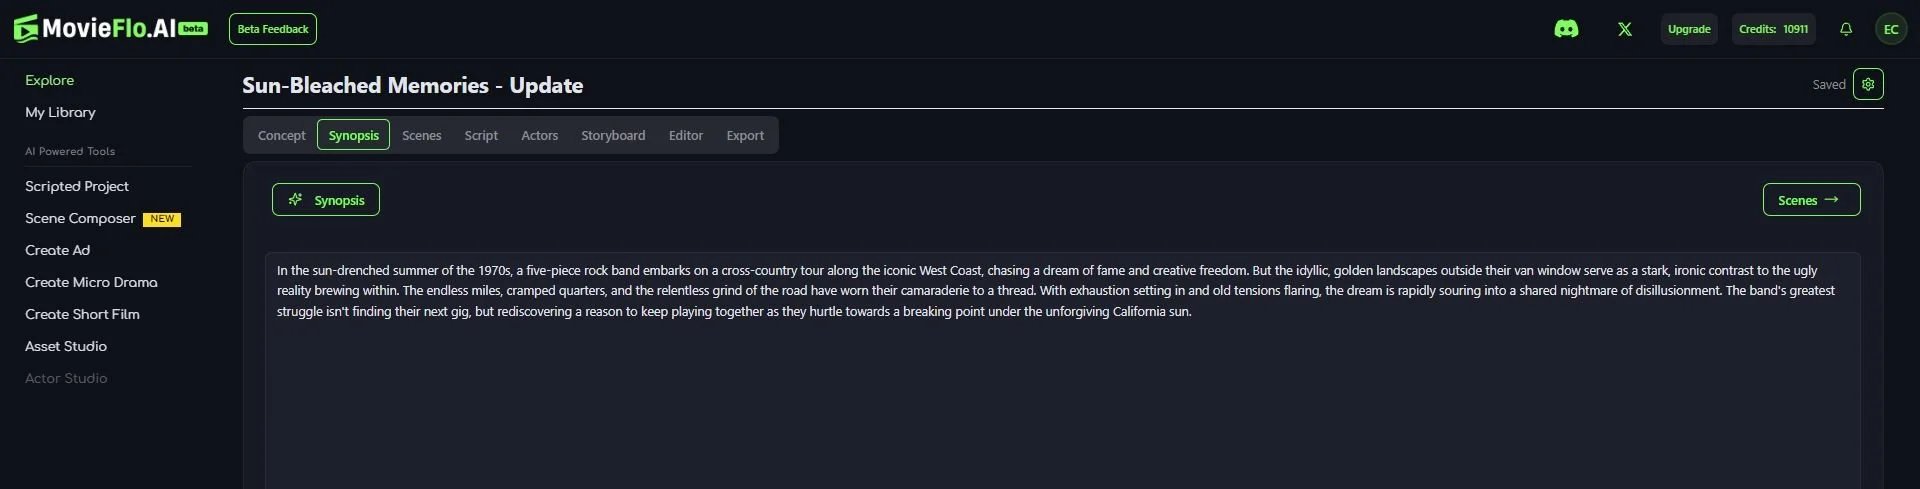
When you're ready and happy with your answers, click (Generate) Synopsis in the top right corner. Flo will create a concise summary of your core concept under the Synopsis tab. Read it carefully, make any edits if needed or re-gen it if you like. Small changes here can make a big difference in your story. You can also go back to edit your initial Concept. Note: If you do this, you will need to regenerate the Synopsis to see the updates
Once satisfied, click (Generate) Scenes:
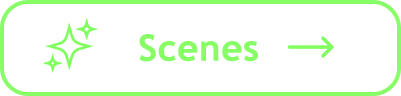
Step 4 - Scene Breakdown
Your story is taking shape! Based on your Synopsis, Flo has generated a Scene-by-Scene Breakdown of your story. The Story Type you selected will determine the structure (3 Acts, 1 Scene, 60 1 min episodes).
Review & Edit Scene-by-Scene Breakdown: Read through the scene-by-scene outline. You can make edits, add a new scene, or delete a scene.
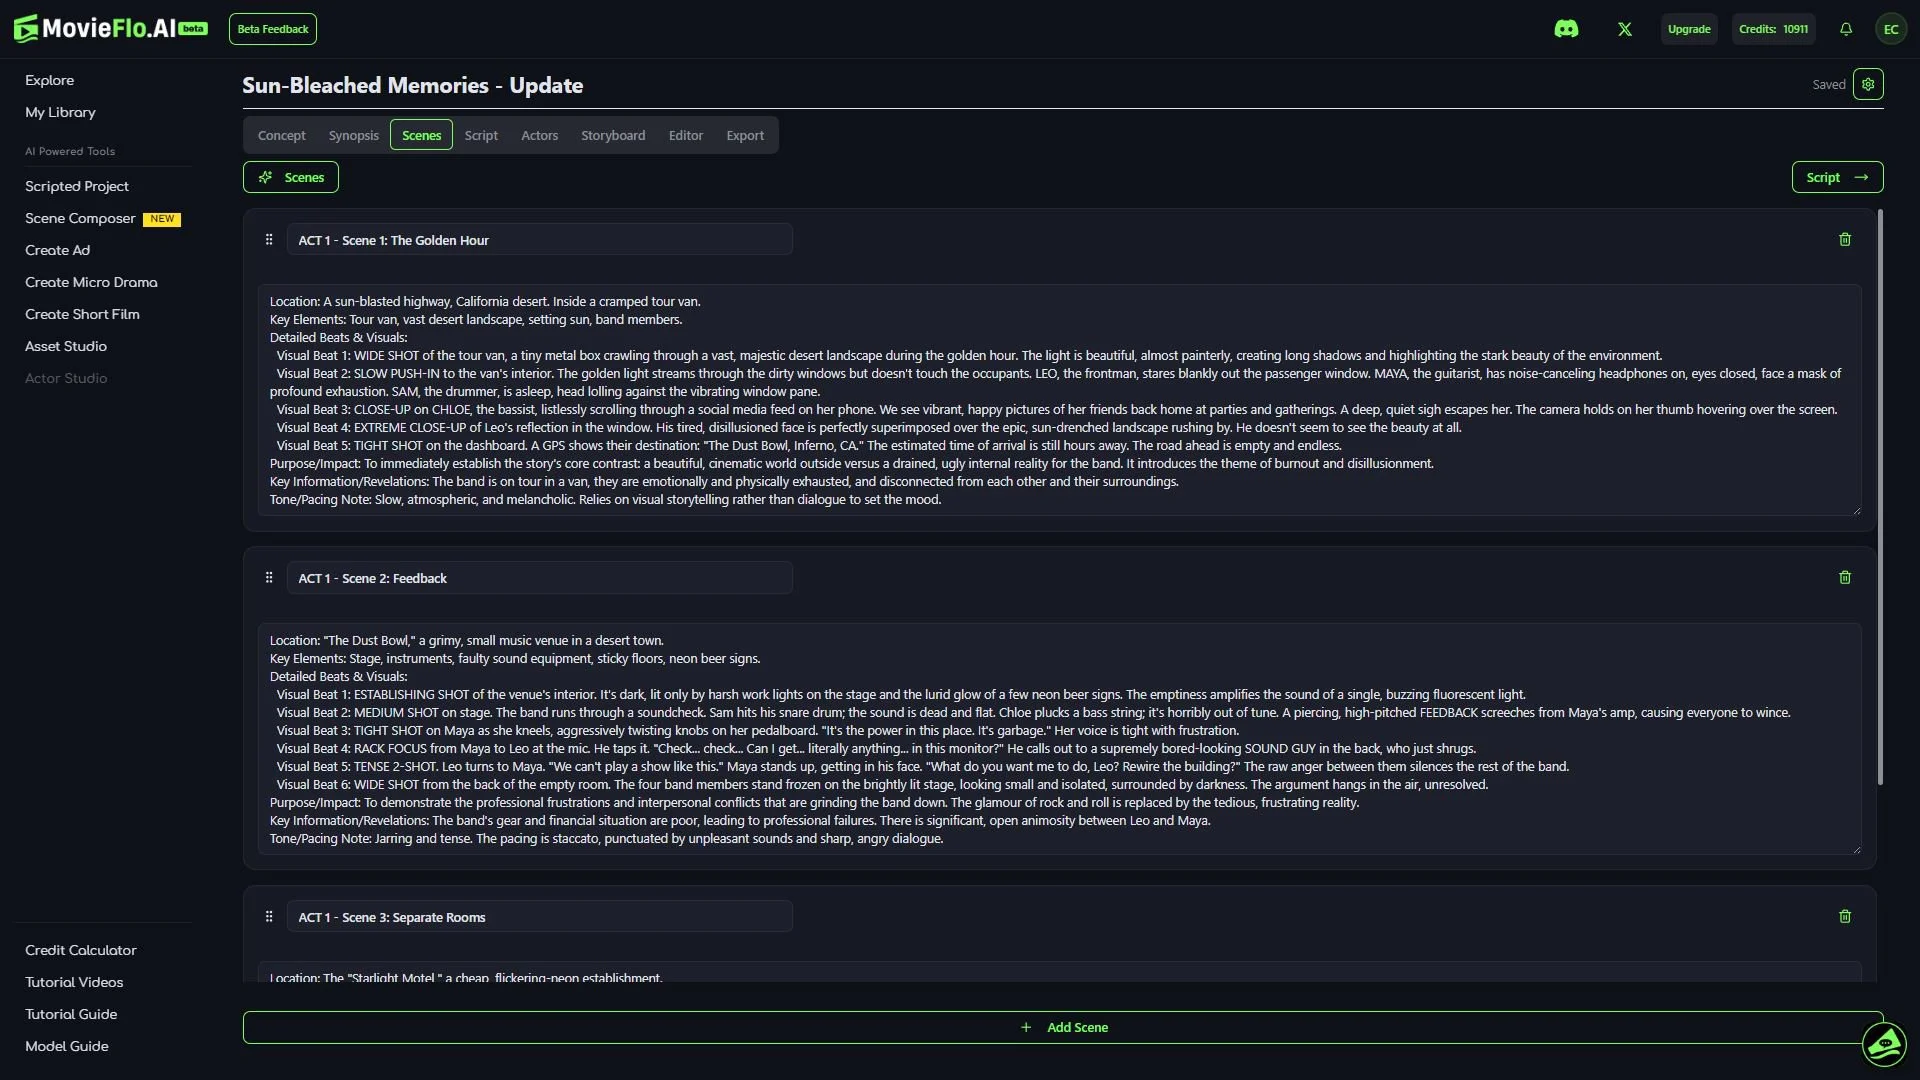
Step 5 - Script
Generate Full Script: When you're happy with the Scene-by-Scene Breakdown, click (Generate) Full Script. The Co-Pilot will write dialogue, action lines, and descriptions for each scene. You can then review and edit the generated script within our editor. Use the fullscreen button to expand the script.
Once your script feels solid, click (Generate) Actors.
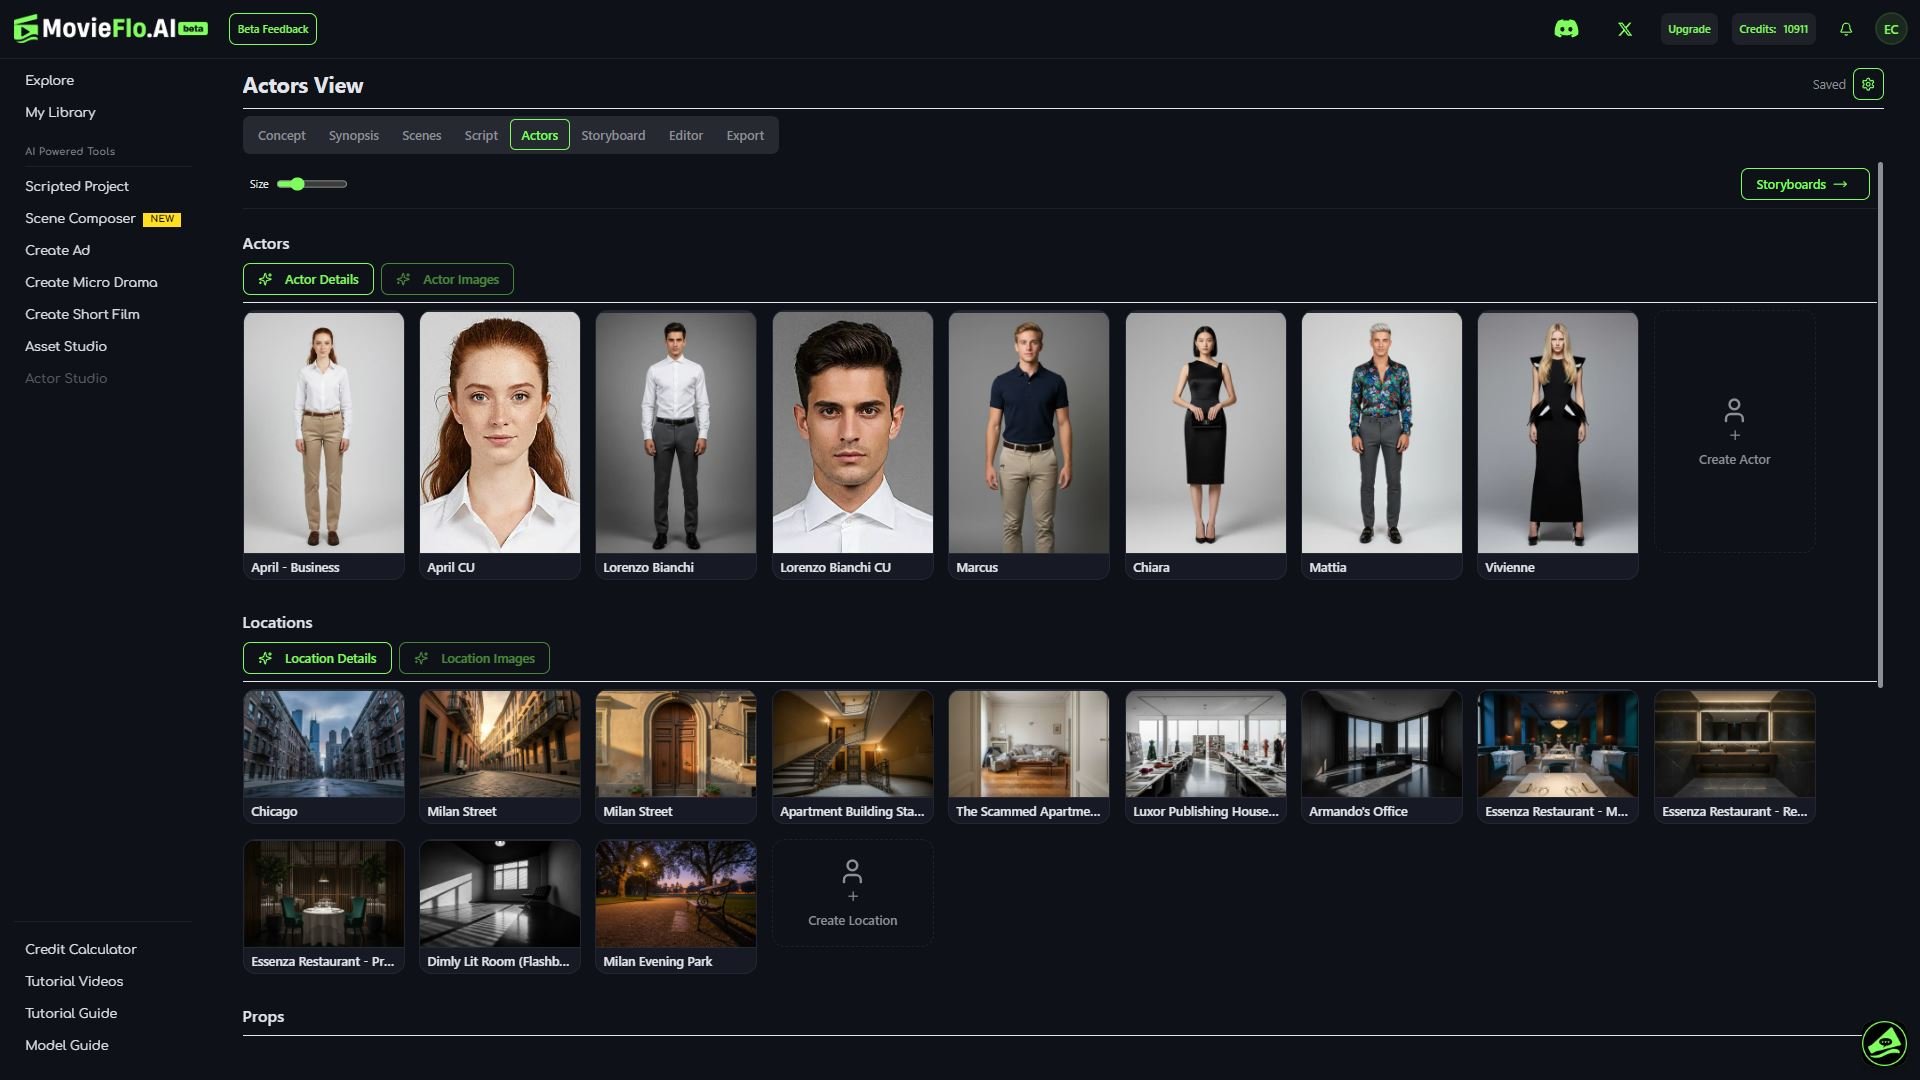
Step 6 - Create Your Actors
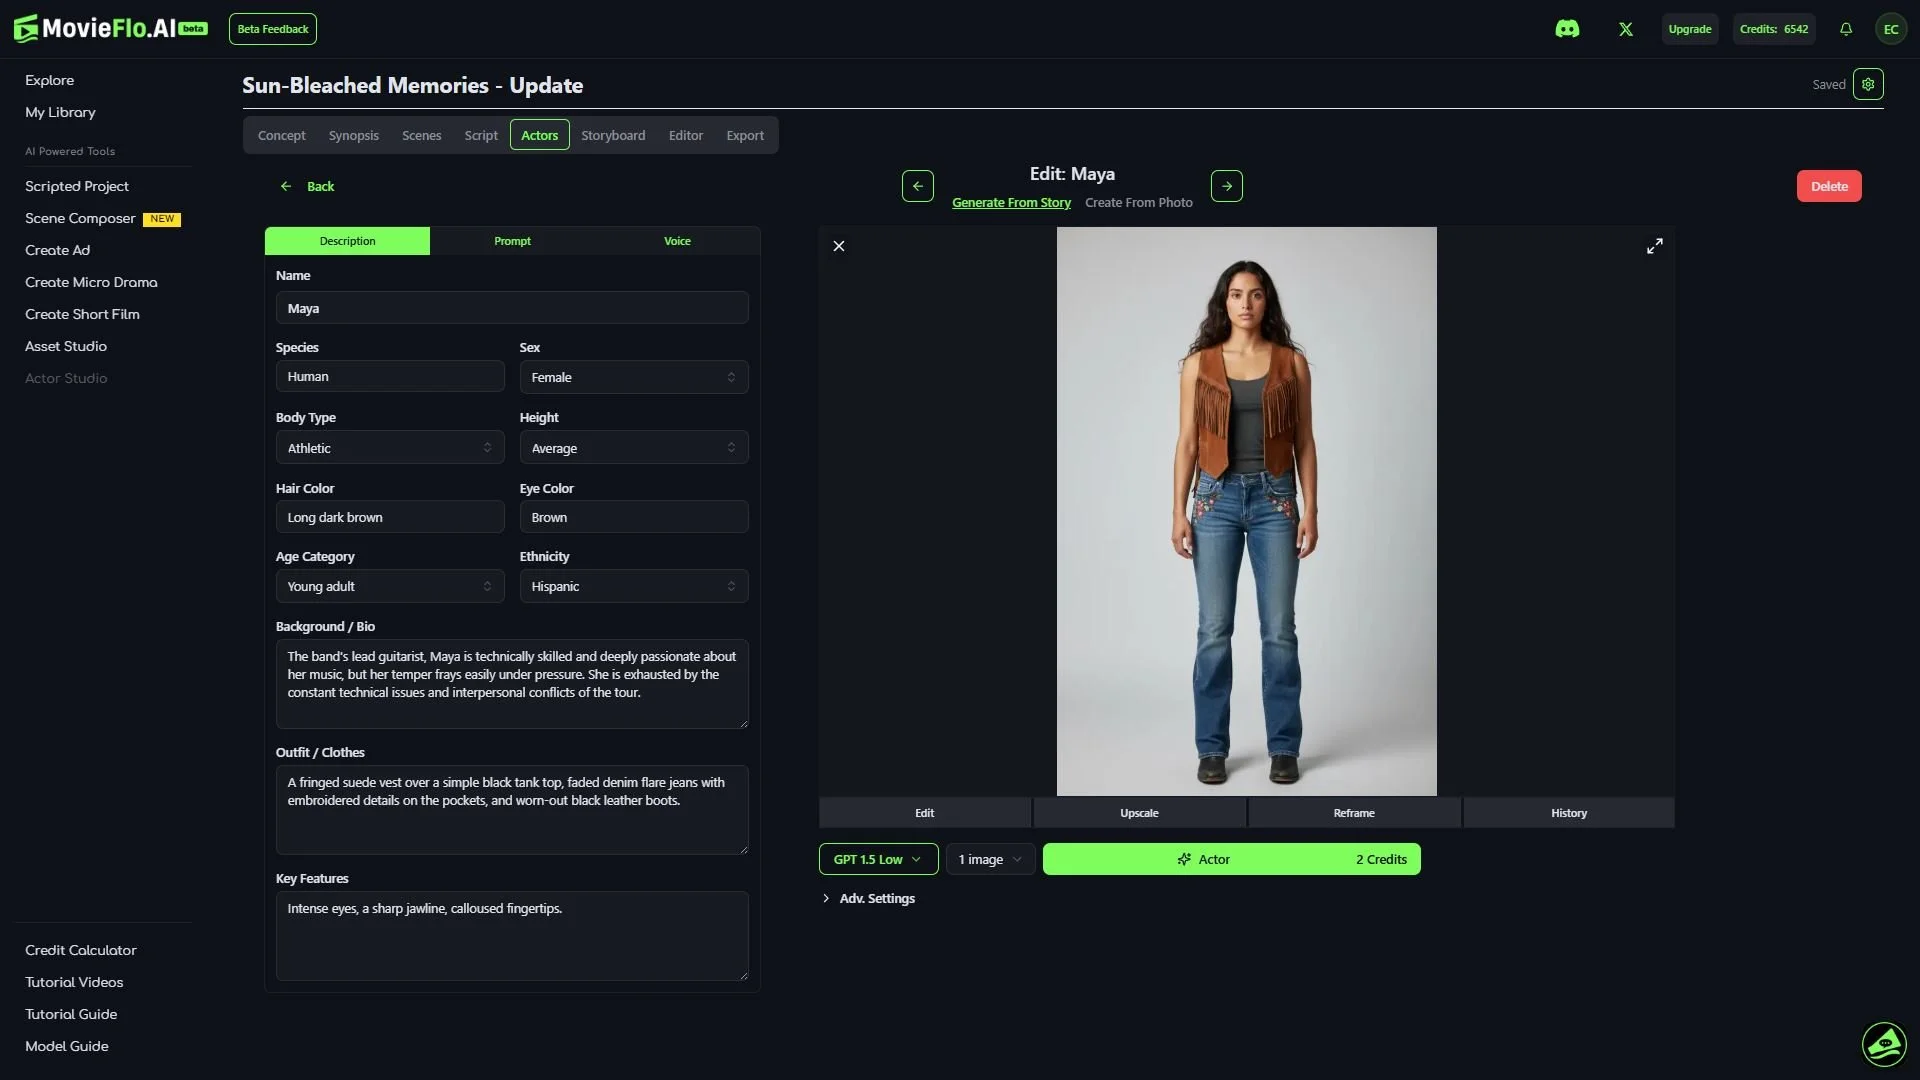
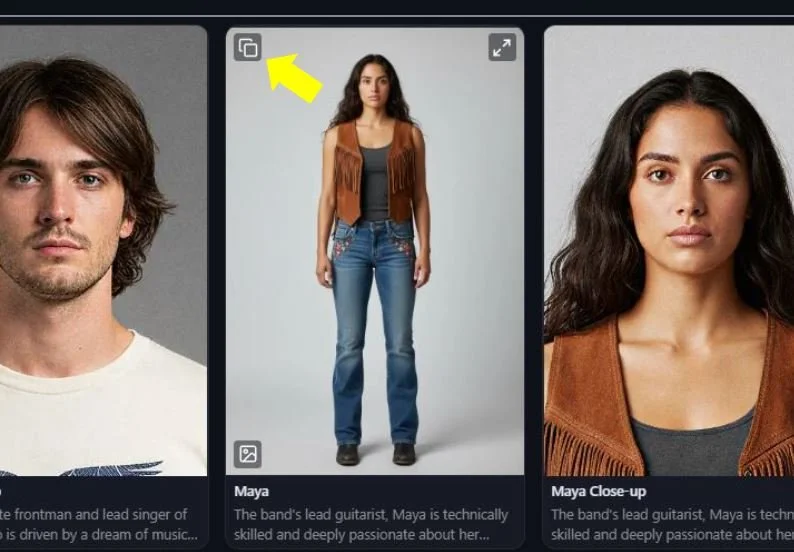
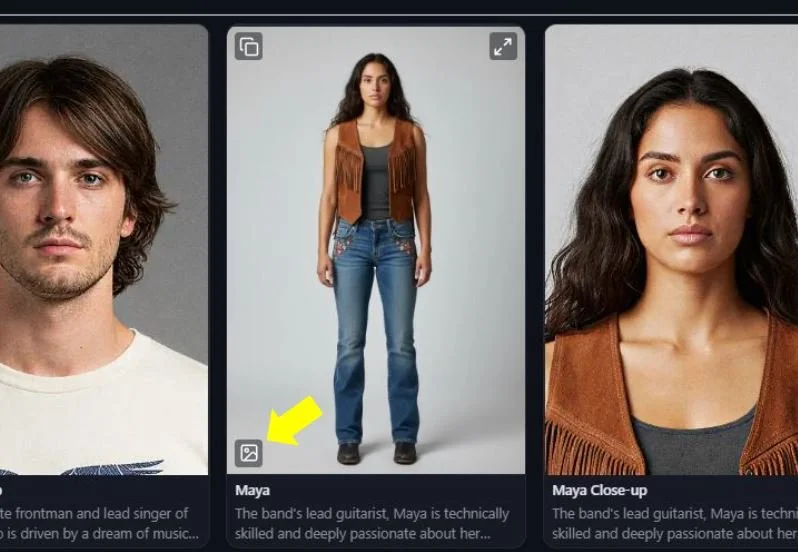
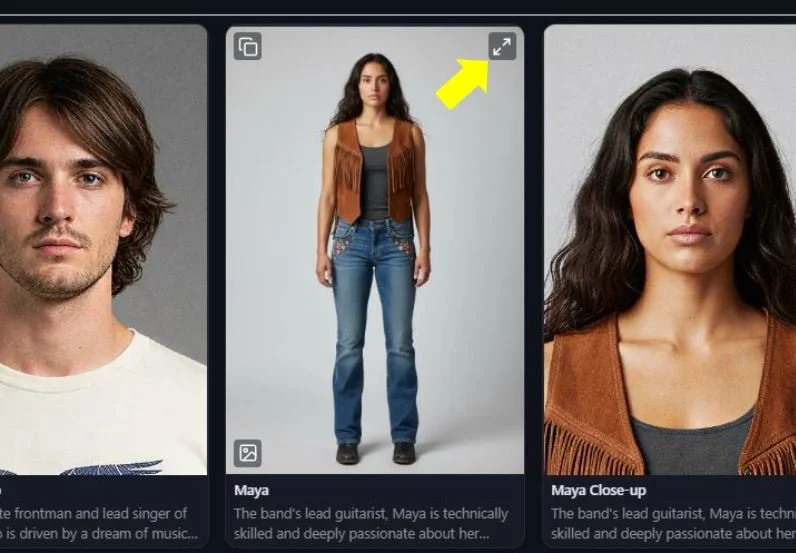
Next, based on your script, MovieFlo will identify the key actors and locations and create descriptions and prompts for them. You will also have the option of generating images for every Actor and Location at once, if you choose to do so. Other options include:
Duplicate Actor - Duplicates an Actor along with its image and details. To duplicate an Actor, click on the button in the top left corner of the Actor image while in the main Actors menu.
Quick Gen an Actor Image - Quickly generate an image for an Actor without having to leave the main Actors menu. To quickly generate an Actor image, click on the button in the bottom left corner of the Actor image.
Finally, if you would like to see a full screen view of an Actor, click on the Expand View button in the top right corner of the Actor image.
You can also take a closer look at the details for each Actor and Location by clicking on them to enter the Editing section.
Generating Actor Images: For each actor, you have two powerful options to create their look:
Generate from Story: MovieFlo will suggest an image prompt based on the actor's details and your chosen project style. You can edit this prompt for more control, or edit the actor details (more on this below under the Options section) and the Image Prompt will be updated automatically. Tip: Start with the AI's suggestion, then tweak it!
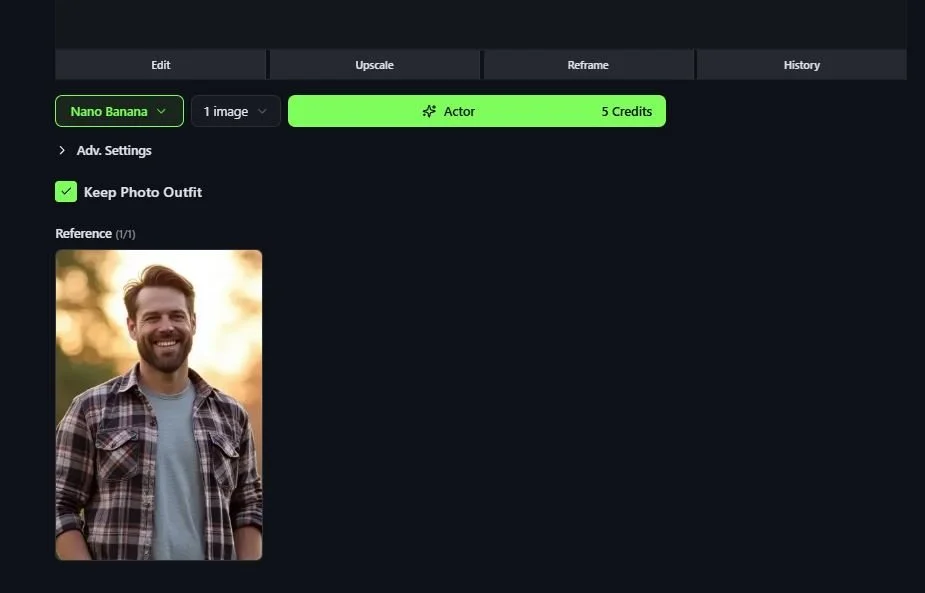
Create from Photo: You can use a photo of yourself, or your friends, etc. and bring them into your story (as long as you have permission). Upload a reference photo. Flo will generate an image prompt to transform it into your chosen style. You can also choose whether to keep the photo's outfit or apply the actor's story wardrobe.
In order to use a photo here, you just drag your photo into the Reference field. You only need a partial body shot for this to work. AI will add the rest. Just make sure the photo has only one subject and is clearly distinct from the background.
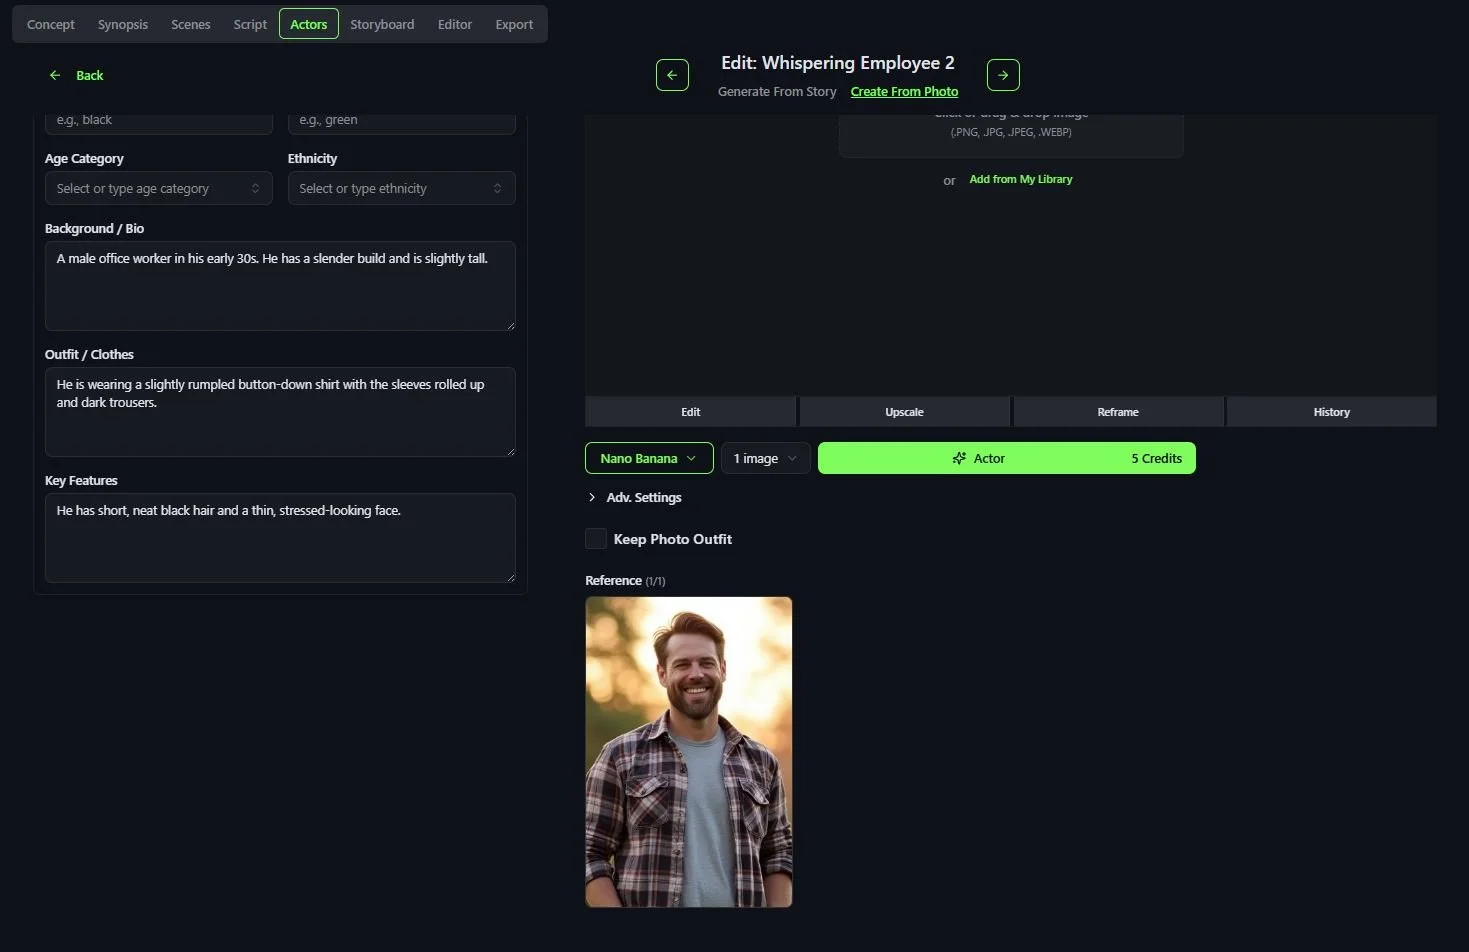
Keep Photo Outfit: Selecting this will keep the outfit the person in the photo is wearing.
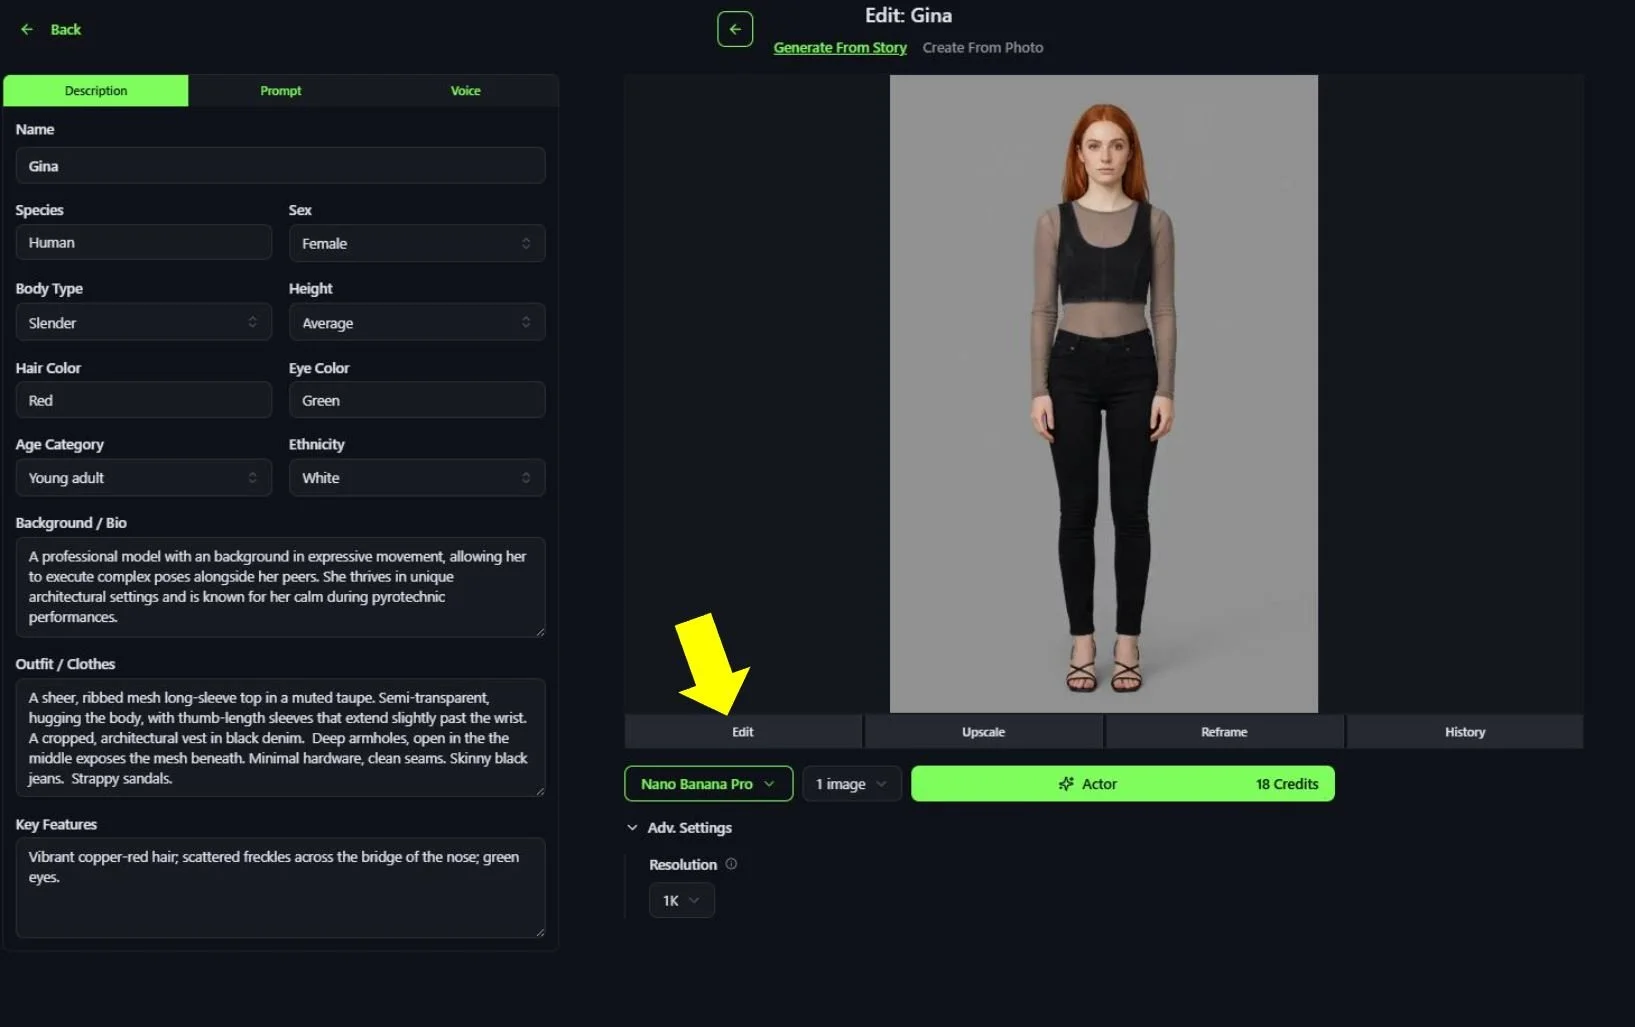
Actor Description: When clicking on an Actor, you will see the description of that Actor on the left side of the screen. This includes the Actor’s name, what they are wearing, their age and other details. Any of these details can be edited so that the Actor image that is generated matches what you envisioned for the Actor in your story. Here is a description of each of the Actor Details. Note these details will be automatically filled in by MovieFlo based on your script. You can create new Actors, or edit any of the details below, which are automatically carried over to your pre-written prompt by MovieFlo.
Species - This shows the species of the Actor. The most common species would be human, but you can edit this field by clicking on it to type in and change the species of the actor to an animal, such as a dog or cat, a plant, an alien, a robot or other species.
Sex - This shows the physical sex of the actor. Clicking on this field will open a list allowing you to choose from Male, Female or Neutral.
Body Type - This describes the physique of the actor. Clicking on this field will open a list of choices; Average, Athletic, Slender, Stocky or Muscular.
Height - This shows the physical height of the actor. Clicking on this field will open a list showing three choices that describe the height of the actor: Short, Tall or Average.
Hair Color - This shows the hair color of the actor. You can edit this field by clicking on it and typing in whatever color you wish the actor’s hair to be.
Eye Color - This shows the eye color of the actor. You can edit this field by clicking on it and typing in whatever color you wish the actor’s eyes to be.
Age Category - This describes the general age of the actor. Clicking on this field will open a list showing these choices: Child, Teenager, Young Adult, Adult and Elderly.
Ethnicity - This describes the ethnicity of the actor. Clicking on this field will open a list of choices you can select from: Native American, Asian, Black or African American, Hispanic, Middle Eastern or North African (MENA), Native Hawaiian or Pacific Islander, White.
Background / Bio - This describes the general background and biography of the actor. For example, this can describe relationships to other actors in the story, their occupation and their role in the story. This field can be edited to make any changes to the actor’s background / bio that you see fit.
Outfit / Clothes - This describes the items of clothing the actor is wearing in detail. This field can be edited if you wish to change anything about the items the actor is wearing, including the color of those items.
Key Features - This describes unique physical features or the appearance of the actor. For example, you can edit this field and add details such as the actor has expressive dark eyes or has an unkempt appearance.

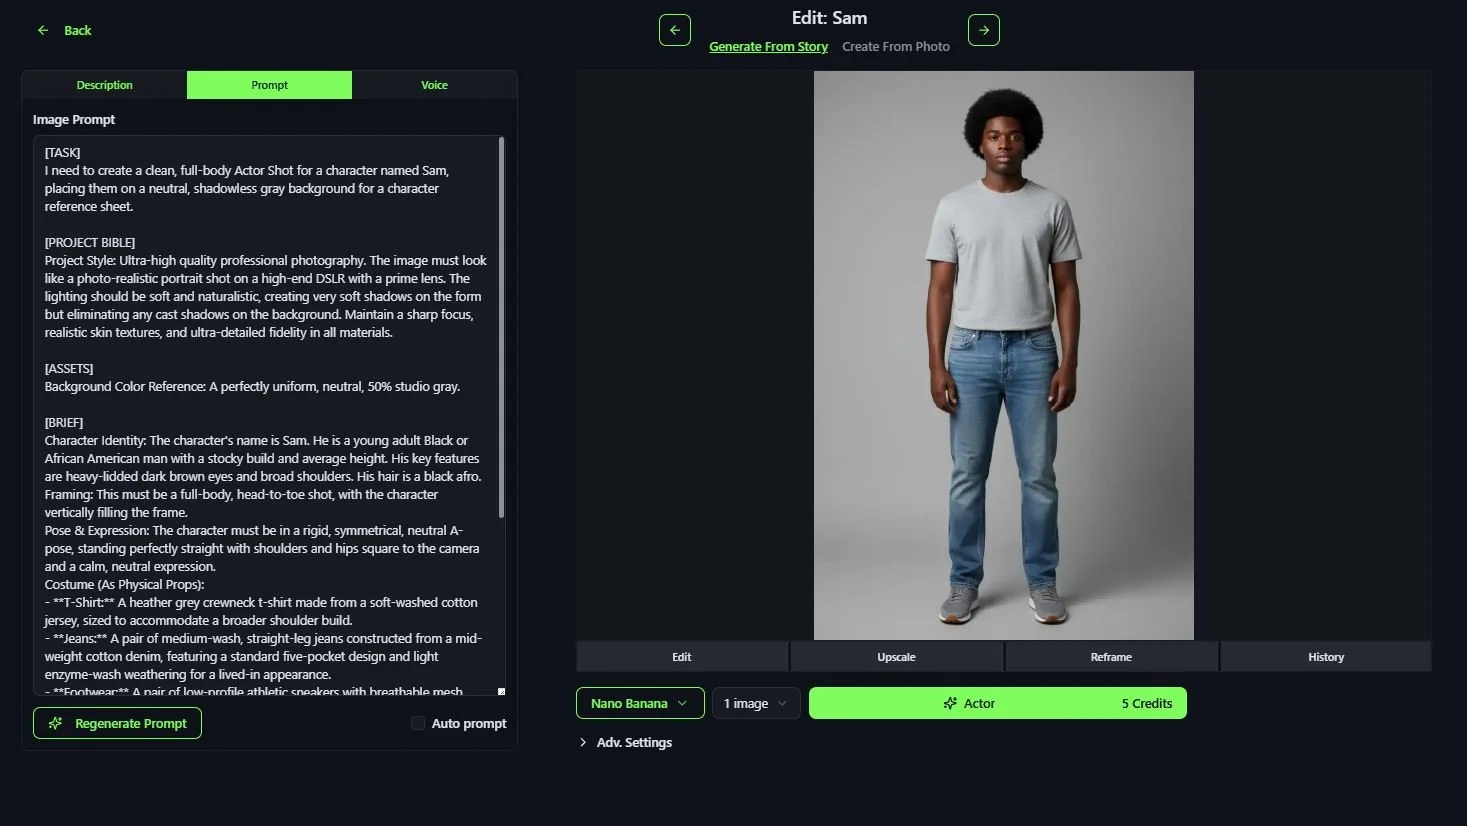
Prompt Tab
Image Prompt - The details from your Actor Description are automatically used in the prompt as long as Auto Prompt is checked. Then, any changes made in the Actor Description are automatically carried over to the prompt. The prompt is the final copy sent to the AI Model to create your image. The prompt can also be edited. The clearer and more specific your prompt, the closer the AI will get to the image you imagined. MovieFlo writes you a clean, structured prompt for each image model based on constant testing and R&D.
Auto Prompt - Any changes you make in your Actor Description are automatically carried over to your prompt if the “Auto Prompt” button is checked. When this box is checked, any changes you make to the details of your shot including the changing of the image model, will cause the Image Prompt to be automatically recreated. This ensures that you will be able to generate the image you intended. The Image Prompt can also be regenerated using the Regenerate Prompt button if you would like to do this manually.
Changing Style - If you wish to change the style of an existing project you do so in the Project Settings. This will update the style tags used to generate your image. You can also manually edit any of these details as you desire.
Voice: You can specify a voice for each actor. Just click on the Voice tab to see and hear the options. Press the play button to hear a sample. (You also have the option to upload your own VO lines later in the Lip Sync section).
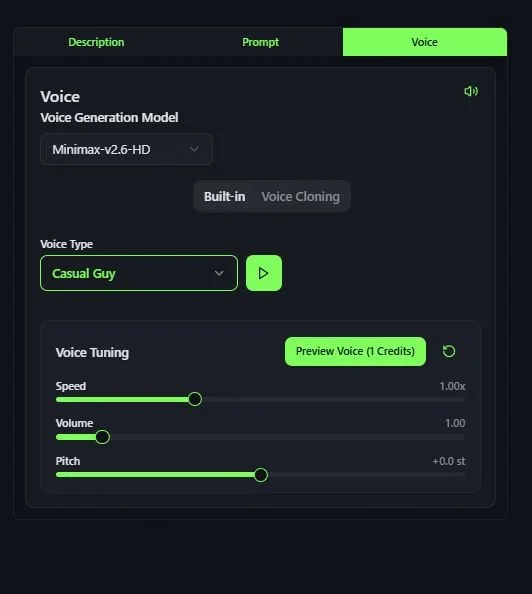
Voice Cloning: This feature allows you to create your own voices simply by uploading a sample of the voice you want to generate.
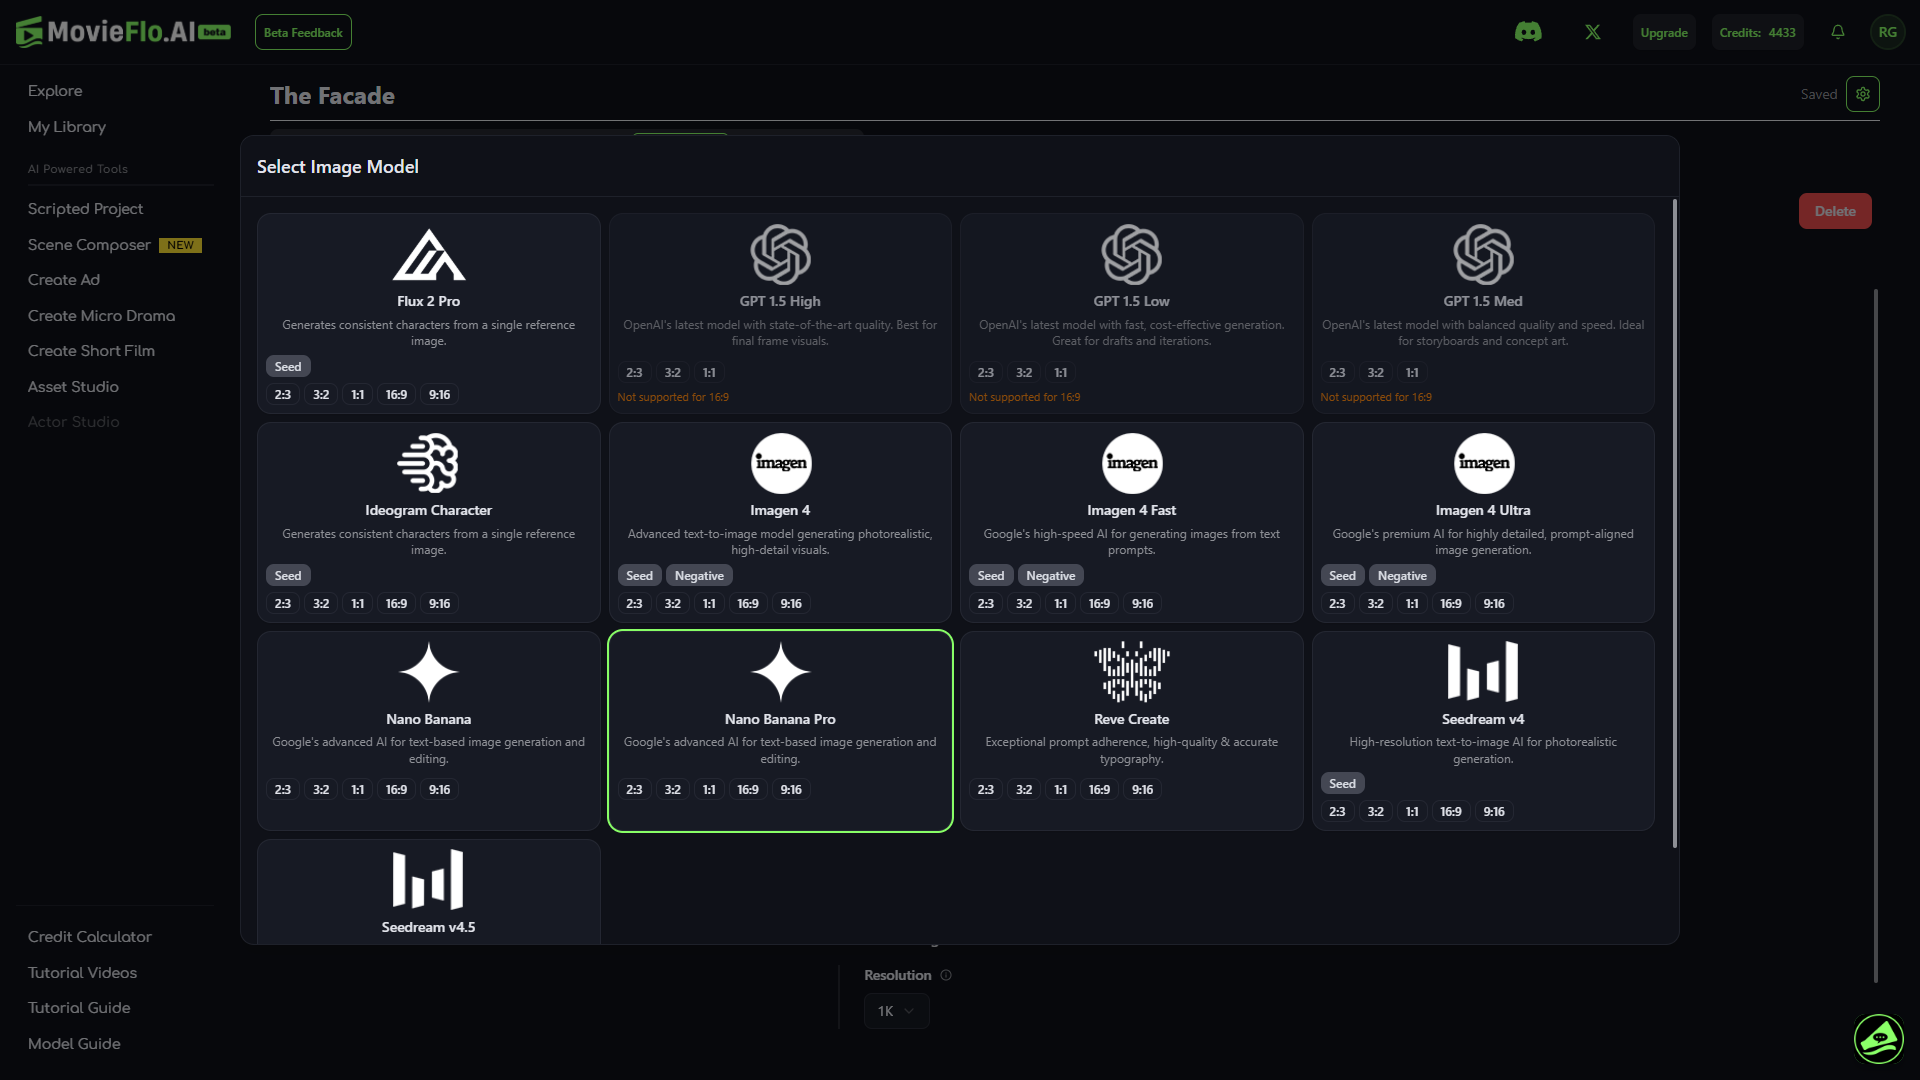
Image Generation Model: This is where you can select from a variety of model options for image generation.
Number of Images: This dropdown menu allows you to select the number of images generated at once for an Actor. You can choose from 1, 2 or 4 images to generate.
Image Prompts - Note: When you change models here, the Image Prompt will update automatically to optimize for the best format for that model if needed. This will take a few seconds but it is important to get the best results out of a given model.
Adv. Settings: Some image models have advanced settings available to use, such as choosing an output resolution for the image being generated, creating a seed number, etc.
Generate Image: Once your text prompt is ready, click the (Generate) Actor button. If you are not happy with the results, you can Re-Generate and if comfortable, make edits to the prompt as well.
Once you have generated Actor images, you will have the option to Edit, Upscale, Crop or Reframe. You will also have access to the history of images you have created here.
Editing Actor Images
Note: The various features listed below have been captured in greater detail in the Editing Images Section.
Editing Actor Images: To make edits to an existing Actor Image, click on the Edit button under the image. This will open a menu that will let you generate a similar image with a change to it.
Upscale Actor Images: To upscale an Actor image using Magnific or Topaz, click on the Upscale button under the image. This will open a menu that will allow you to upscale the image and make other changes to it. You will see options to use Magnific Upscaler for creative or precision.
Reframe Actor Images: Reframe by Luma can help you adjust the Aspect Ratio of an image. To reframe an Actor image, click on the Reframe button under the image. This will open a menu that will allow you to reframe the image to your liking.
Adjust Actor Images: This tool allows you to manually zoom in and crop your images. To adjust an image, click on the Edit button under the image and then click on the Adjust button on the right side of the Image Edit menu.
Generation History: Once you’ve generated at least one image, you will see a History button appear under the image that allows you to look back through all images you have generated for this particular Actor. The history also contains the prompt that was used to make that generation.
Locations
Located in the Actors section, there are other reference images that can be generated as well. MovieFlo will identify key Location Details in your story automatically when you first enter the Actors section. MovieFlo will suggest an image prompt for the locations in your story based on the location's details and your chosen project style. You can edit this prompt for more control, or edit the location description and then regenerate the Image Prompt. You can also choose to generate an image from a reference photo, use an image from My Library or upload an image you have of the location (as long as you have permission).
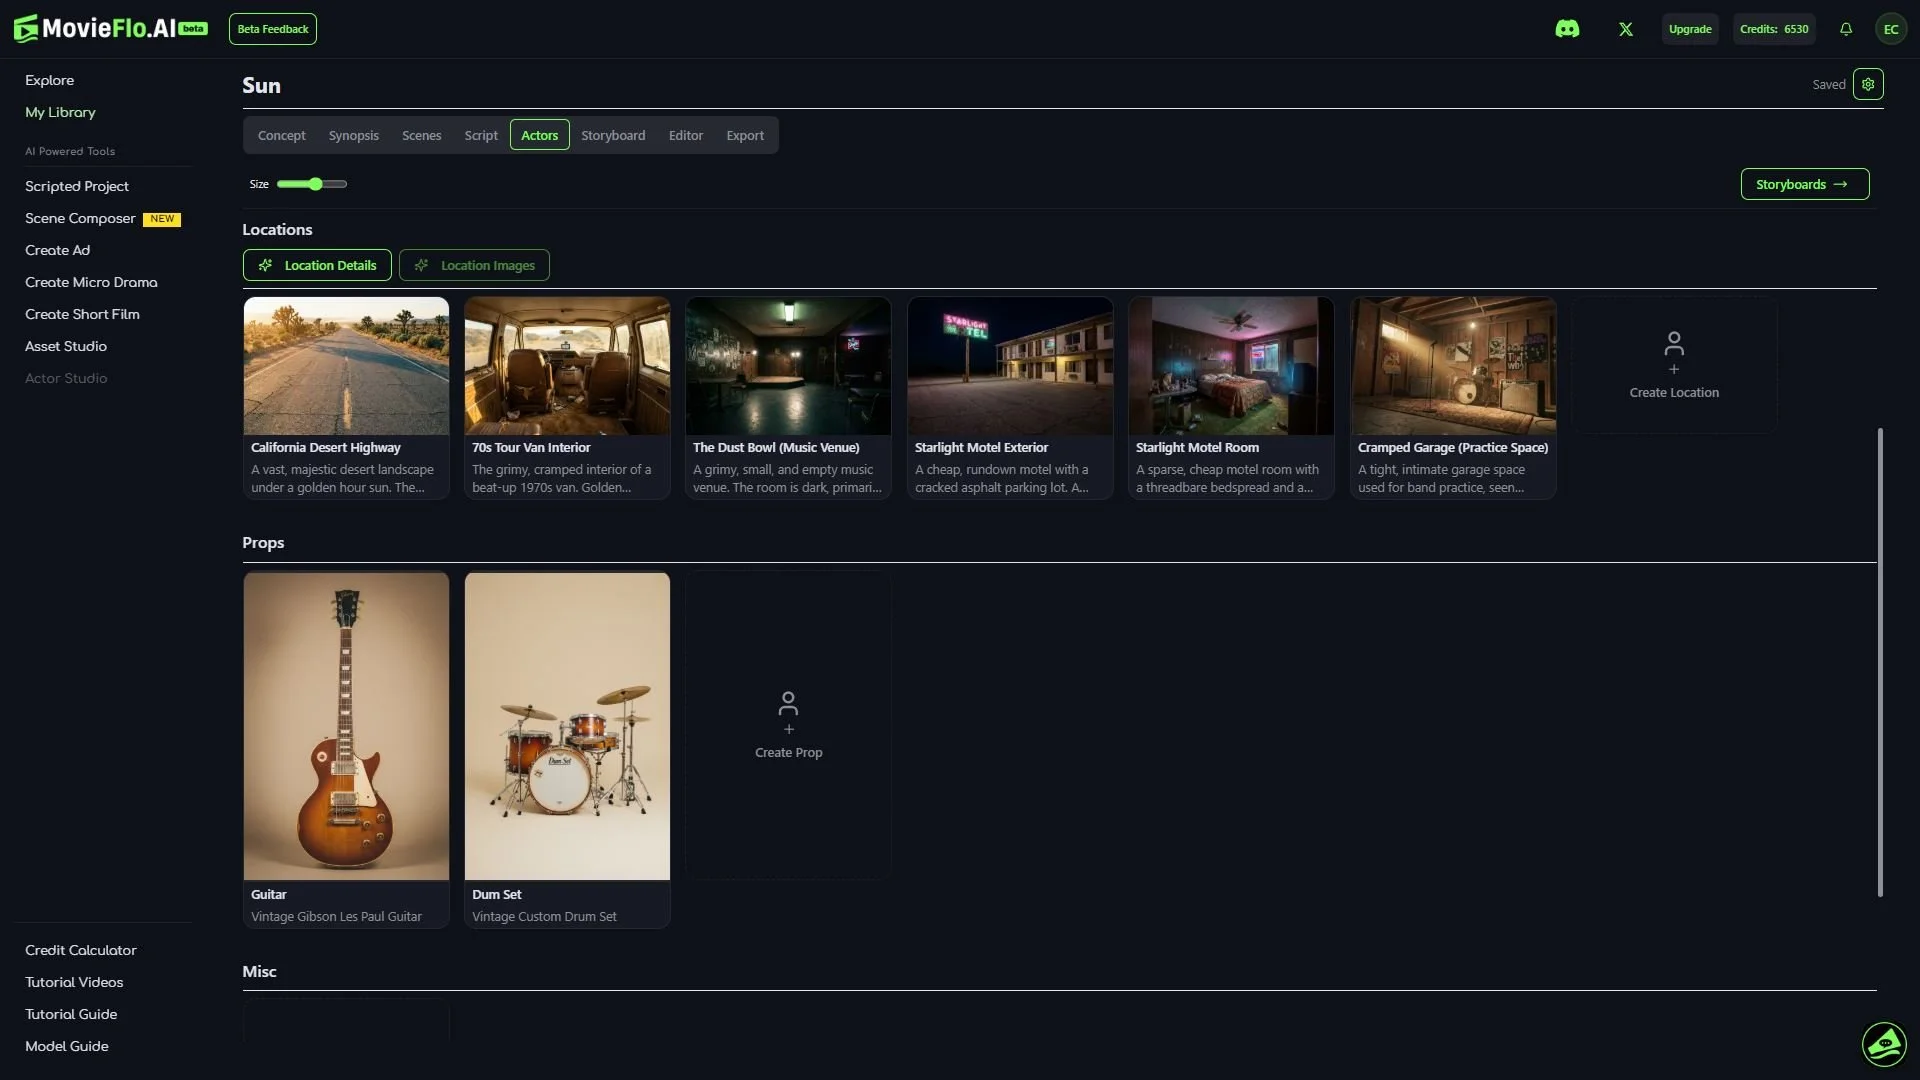
Props
Any specific props you have in your story, such as an artifact or an actor’s favorite personal item, can be added here. While MovieFlo will not identify props automatically, you can describe the prop and generate images just like you can with actors and locations. Just click on the Create Prop button, add a description of the prop and then click on the Generate Prompt button. This will create an image prompt for your prop. You can then generate an image by clicking on the (Generate) Prop button. You can also choose to generate an image from a reference photo, use an image from My Library or upload an image you have of the prop (as long as you have permission).
Miscellaneous
Similar to Props, any miscellaneous items you want to generate images for can be done here. While MovieFlo will not identify miscellaneous items automatically, you can describe the miscellaneous item and generate images just like you can with actors and locations. Just click on the Create Misc button, add a description of the miscellaneous item and then click on the Generate Prompt button. This will create an image prompt for your miscellaneous item. You can then generate an image by clicking on the (Generate) Misc button. You can also choose to generate an image from a reference photo, use an image from My Library or upload an image you have of the miscellaneous item (as long as you have permission).
Ok once you are happy with your Actors, click: (Generate) Storyboards
Step 5 - Storyboards & Video
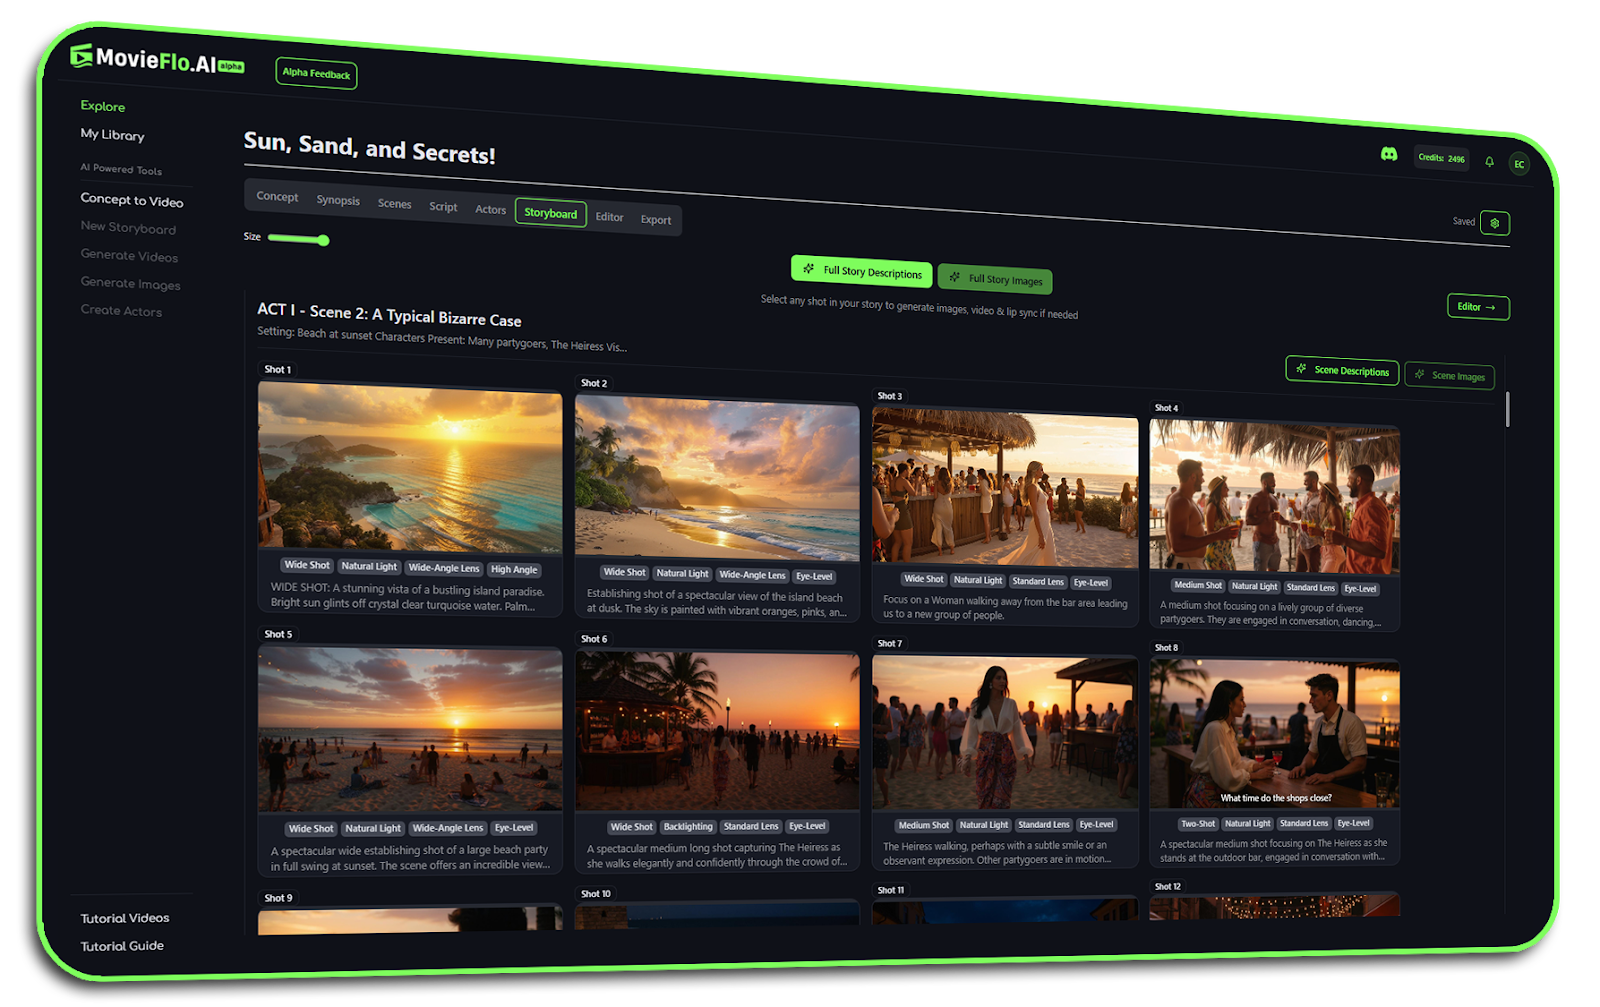
The Storyboard is where your story comes to life and you will likely spend the most time in. MovieFlo.AI first generates detailed scene descriptions, storyboard images and then video clips for your entire Story.

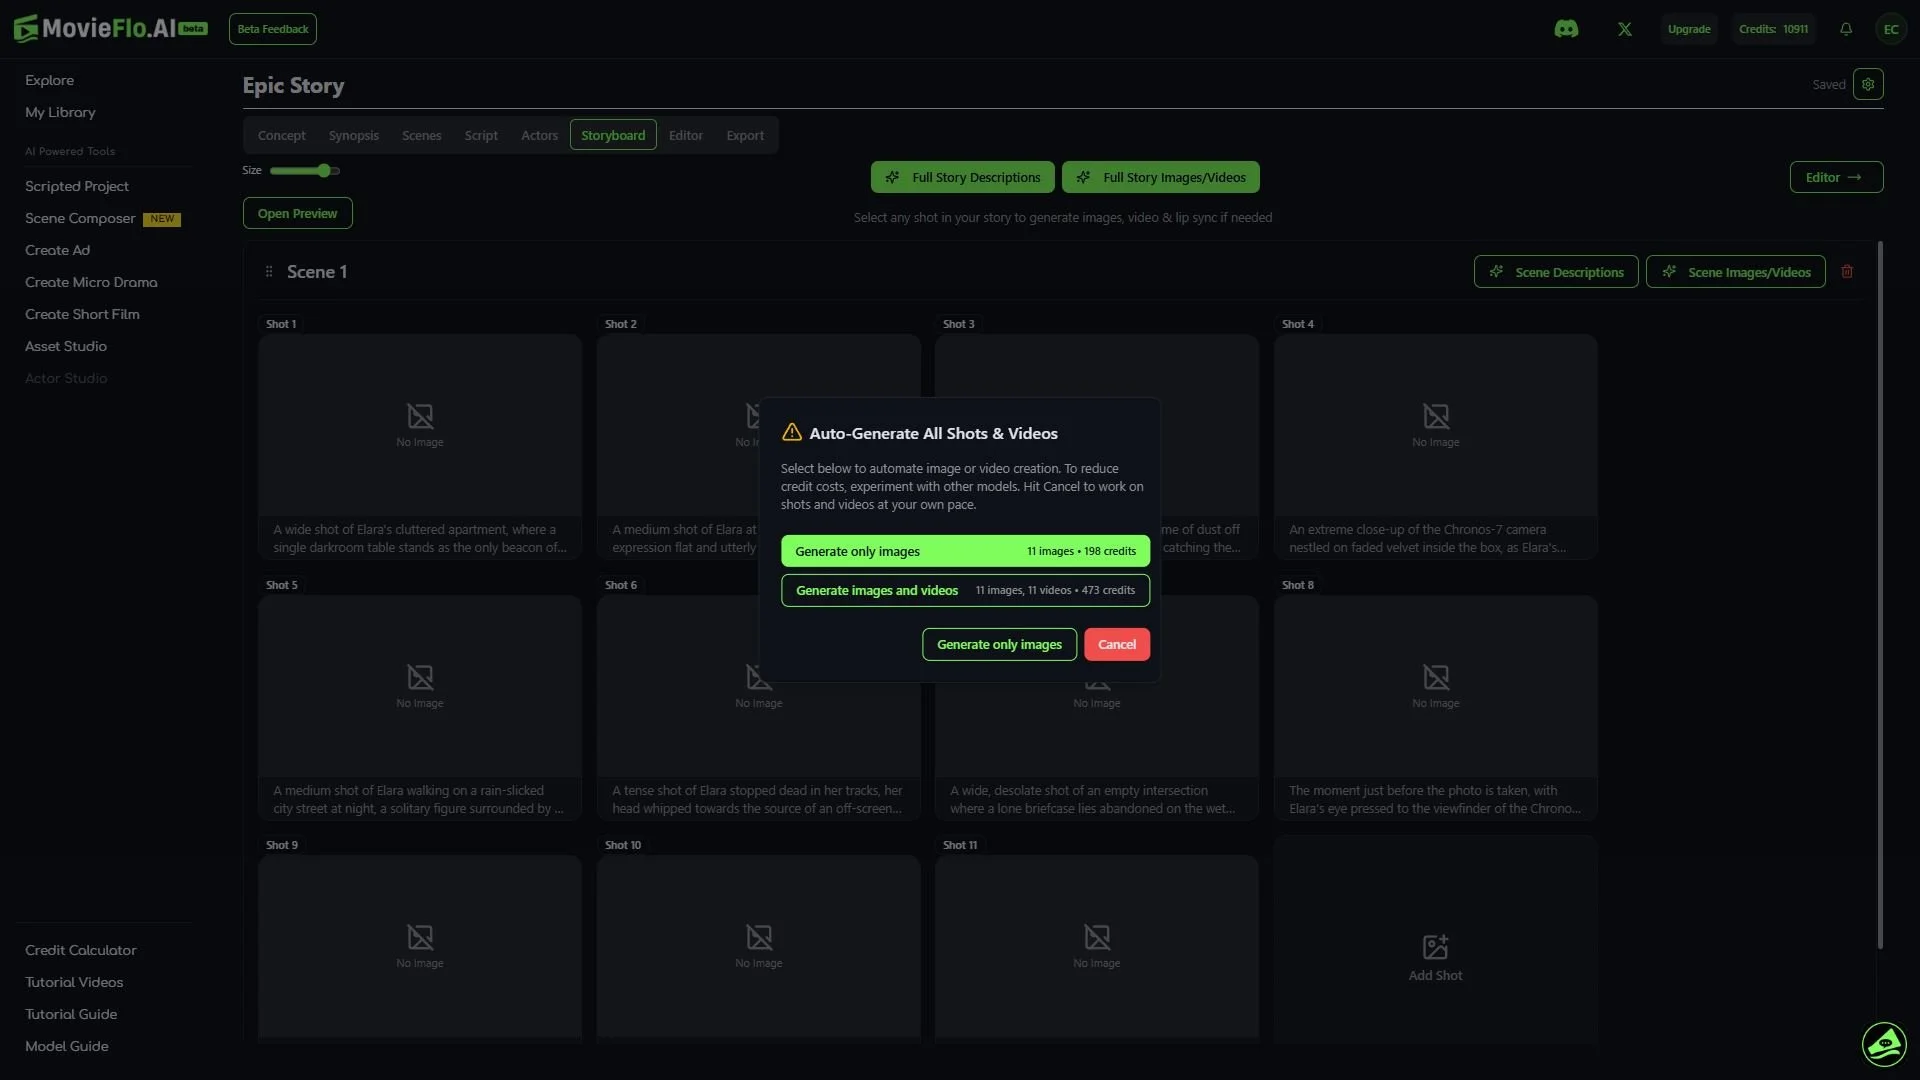
Please be mindful of generating videos and the associated credit cost.
Overview
When you first enter the Storyboard section, your Scenes and Shot Descriptions will be pre-generated based on your script. You will also have the option of generating images and videos for every shot in the Storyboard all at once. For maximum control, we recommend allowing MovieFlo to generate a first pass of the images, then go in as needed and re-gen or edit them. Your images will use the default model you set when you created the project. Remember to change or set this to a higher end model such as Nano Banana Pro for best results.
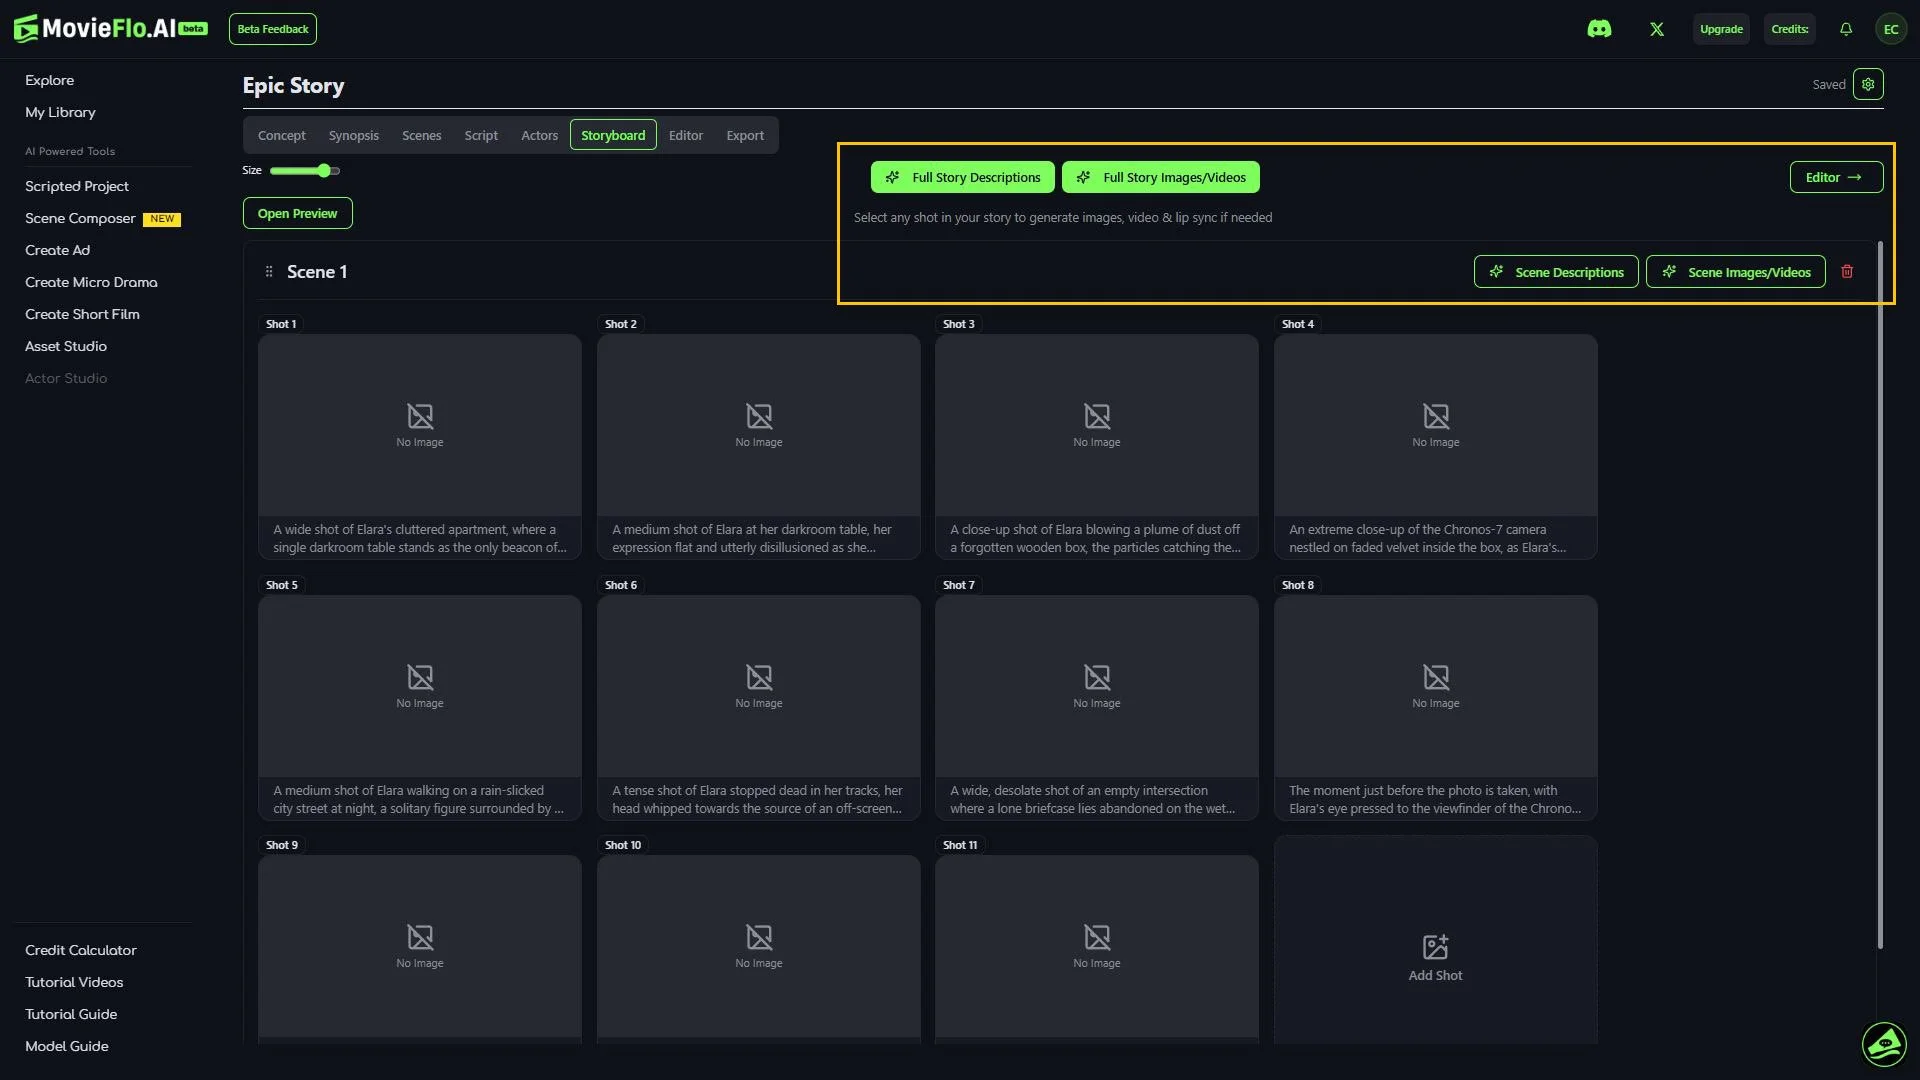
Scene and Story Quick Generate Buttons
(Generate) Full Story Descriptions - Re-gens your entire Storyboard.
(Generate) Full Story Images - Generates all the images for an entire story.
(Generate) Scene Descriptions - Generates all the shots and Scene Descriptions for each Scene.
(Generate) Scene Images - Generates all the images for an entire scene.
Duplicate Shot - Duplicates a Shot and adds that shot into the scene. To duplicate a shot, click on the button in the top left corner of the Shot Thumbnail.
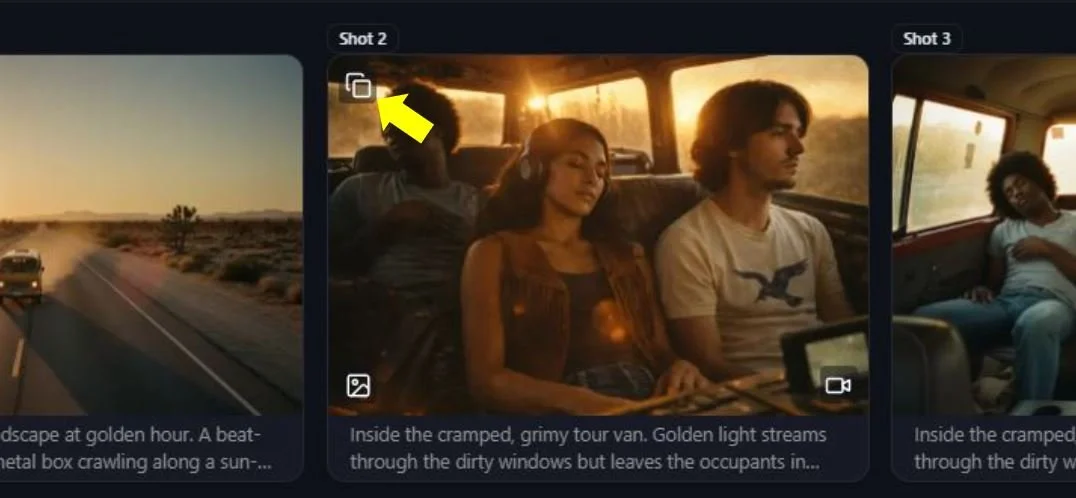
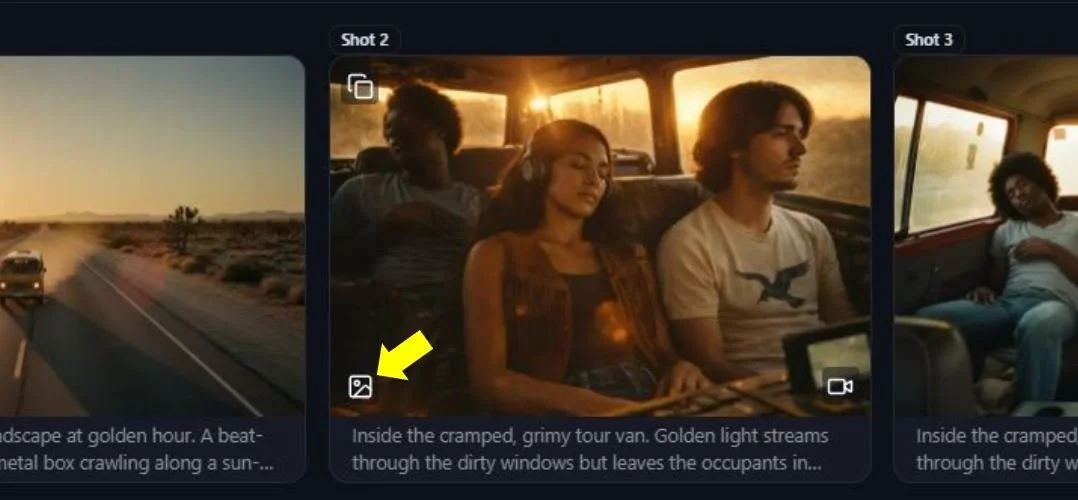
Quick Gen Image - Quickly generate an image for a shot without having to leave the main Storyboard menu. To quick gen an image, click on the button in the bottom left corner of the Shot Thumbnail.
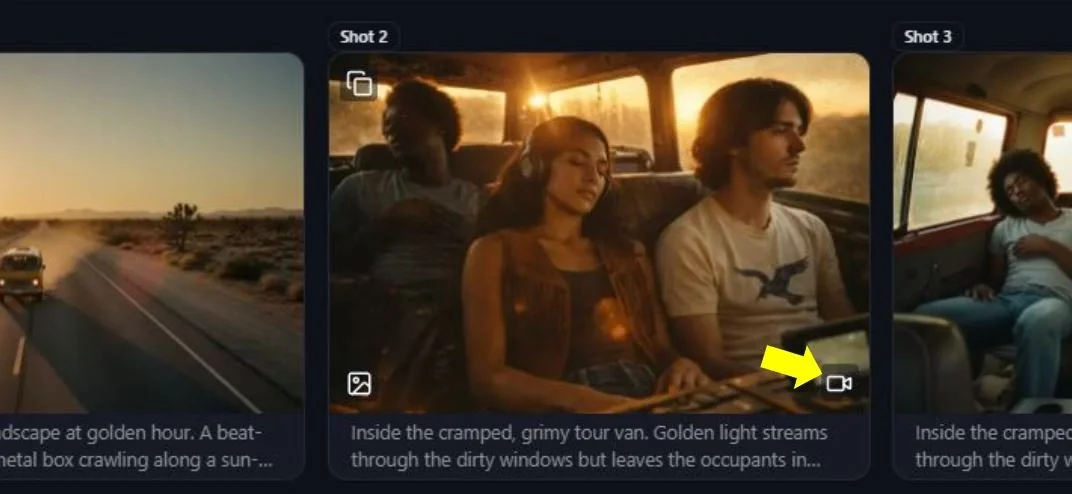
Quick Gen Video - Quickly generate a video for a shot without having to leave the main Storyboard menu. To quick gen a video, click on the button in the bottom right corner of the Shot Thumbnail.
Section 1: Generating Storyboard Images
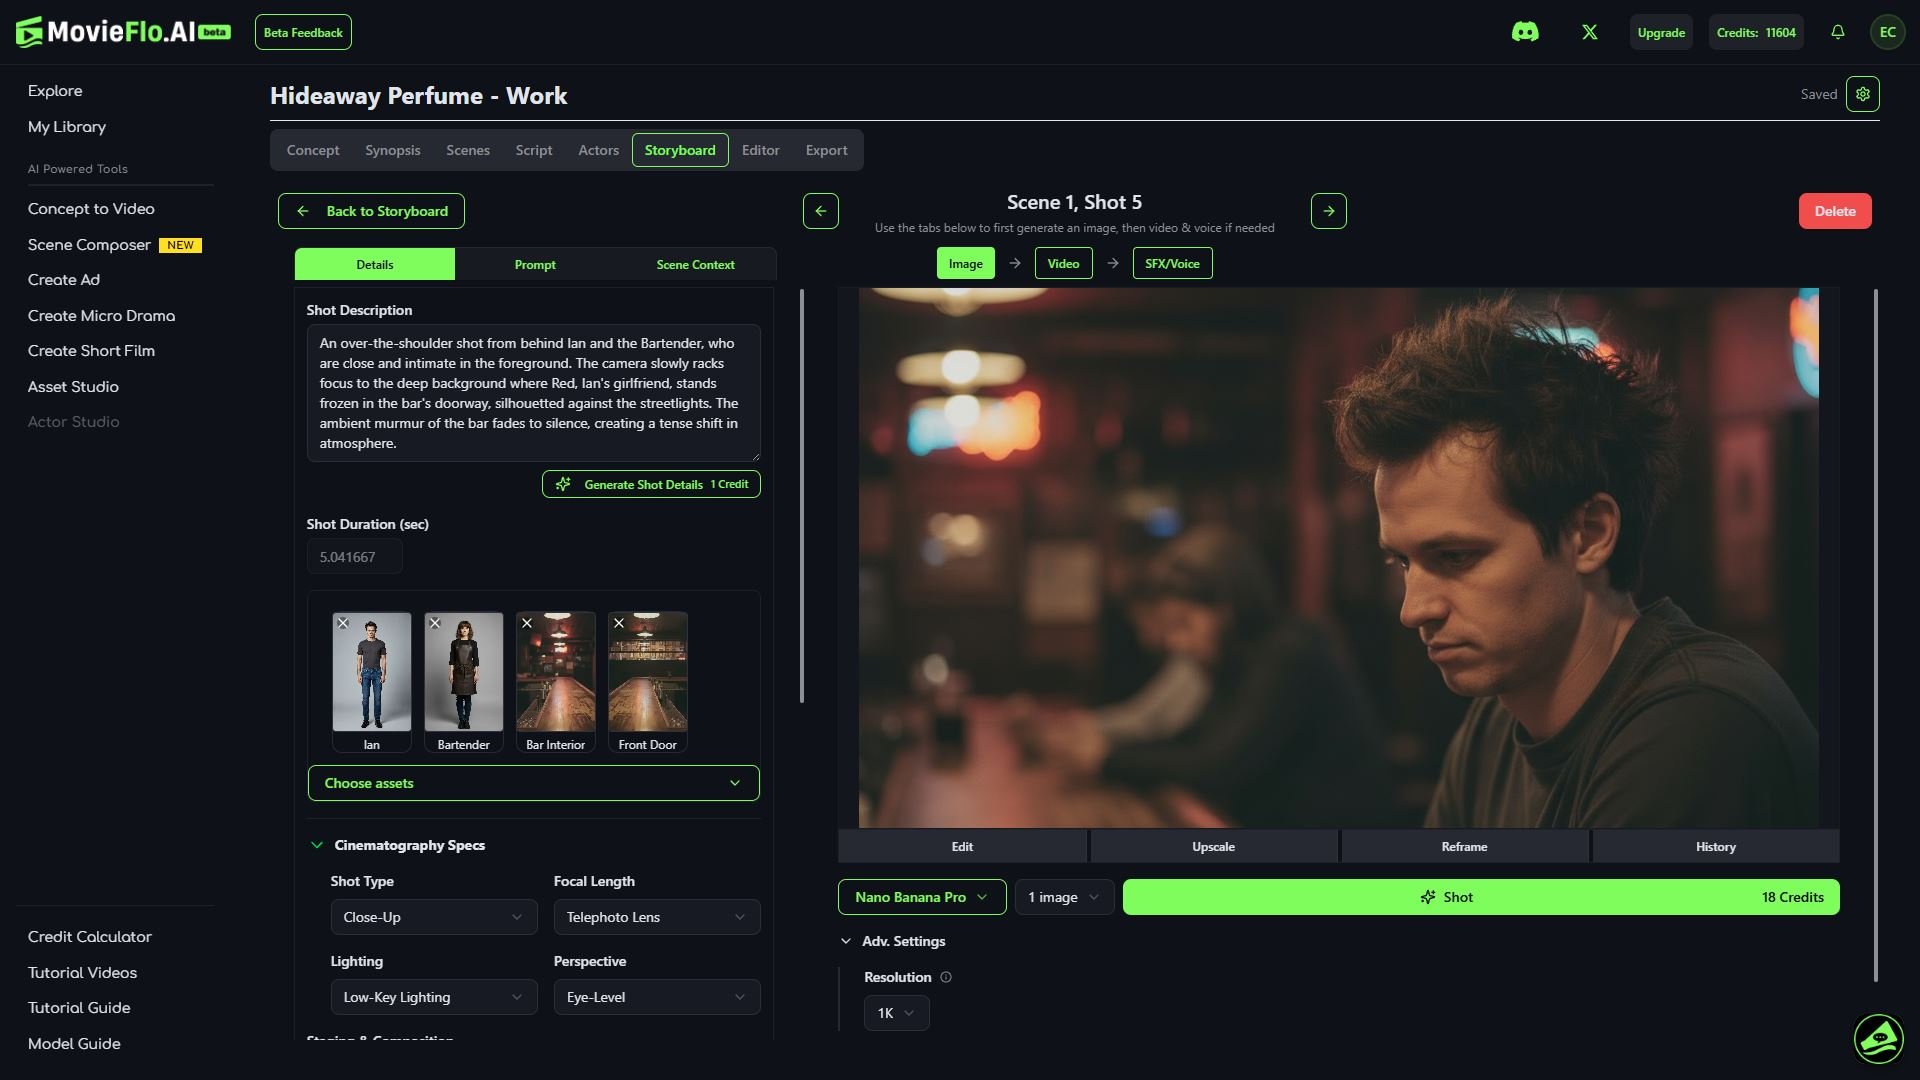
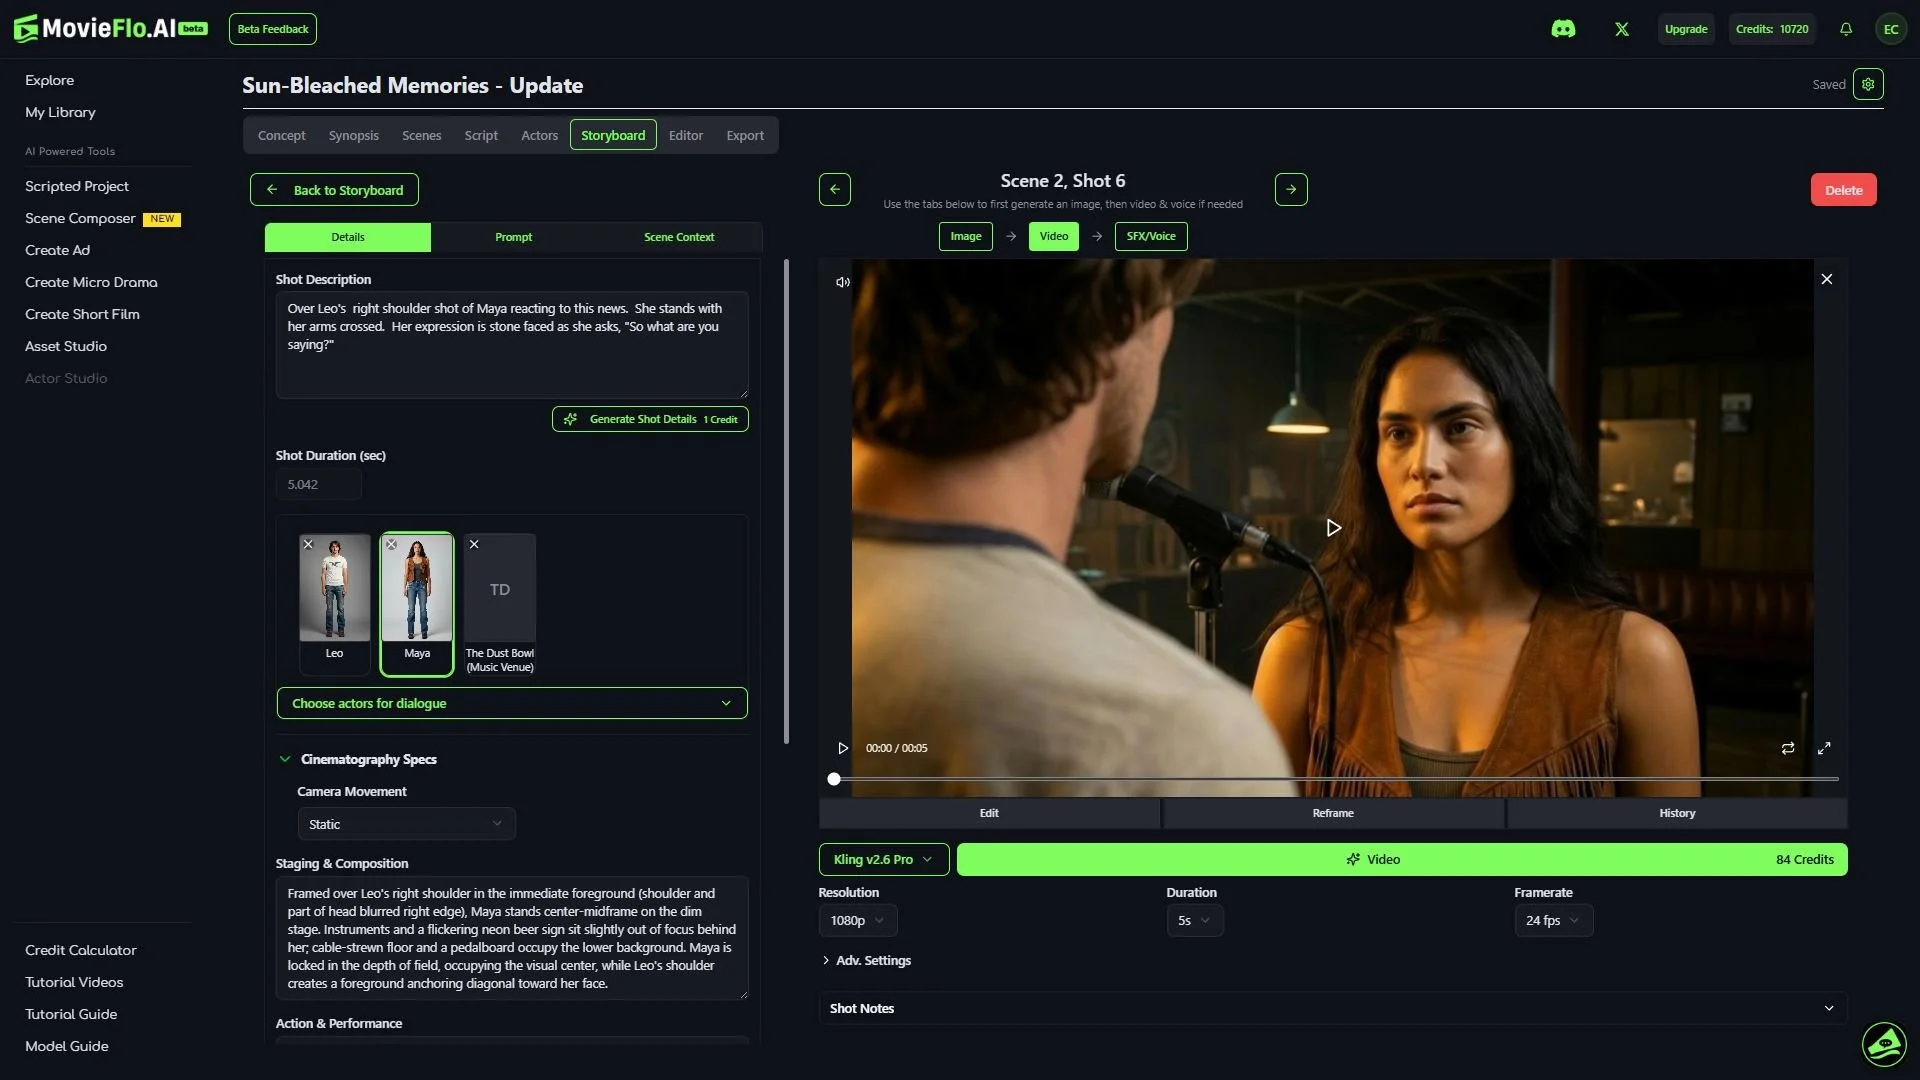
Select Shot - Click on any shot in the Storyboards to enter the Generate Shot view to view the details of the shot you want to create.
Details - This menu includes information about your Shot that MovieFlo has automatically filled in based on your script. You can edit the details of any shot and these will be automatically carried over to your prompt.
Shot Description - Basic description of what is happening in the shot. Changes made here can affect the prompt if you click Regenerate Prompt afterward.
Generate Shot Details Button - This will fill in all the details below based on your Shot Description.
Choose Assets (Actors) - MovieFlo has pre-selected the actors (Characters, Locations, Etc.) for each shot for you. You can edit or change these at any time.
Cinematography Specs - Here you can select the Shot Type (eg. Close Up, Medium Shot), Focal Length, Lighting and Perspective.
Staging & Composition - Explains the elements in the shot and how they are displayed.
Action & Performance - Explains what is happening in the shot.
Set & Lighting - Explains how the shot is being lit and the source of light in the shot.
Decisive Moment - The key moment in your shot.
Dialogue - If the script calls for any dialogue, it is listed here. It should be automatically associated with the actor that is speaking. You can alter this dialogue, as desired. You can also remove or add dialogue to shots.
Prompt Tab
Image Prompt - The details from your Shot Description are automatically used in the prompt as long as Auto Prompt is checked. Then, any changes made in the Shot Description are automatically carried over to the prompt. The prompt is the final copy sent to the AI Model to create your image. The prompt can also be edited. The clearer and more specific your prompt, the closer the AI will get to the image you imagined. MovieFlo writes you a clean, structured prompt for each image model based on constant testing and R&D.
Auto Prompt - When this box is checked, any changes you make to the details of your shot (eg. Set & Lighting), including the changing of the image model, will cause the Image Prompt to be automatically regenerated. This ensures that you will be able to generate the image you intended. The Image Prompt can also be regenerated using the Regenerate Prompt button if you would like to do this manually.
Scene Context - While this section cannot be edited here, it explains what is going on in the entire scene. If you decide you want to edit this, it can be done under the Scenes tab for each individual scene in your project.
Image Models - The current default image model is Nano Banana. You can use the Select Image Model menu to choose from a plethora of the latest image models. It is important to keep in mind each model has its own credit costs associated with them, based on factors such as aspect ratio. The credit cost is displayed for each model on the right of the (Generate) Shot button.
Number of Images: This dropdown menu allows you to select the number of images generated at once for a Shot. You can choose from 1, 2 or 4 images to generate.
Adv. Settings - For advanced users. Options available vary depending on the image model being used.
Shot Notes - Beneath the prompt is a section for any additional notes you may want to add manually. These have no effect on the prompt or image.
Generate Image by clicking on (Generate) Shot.
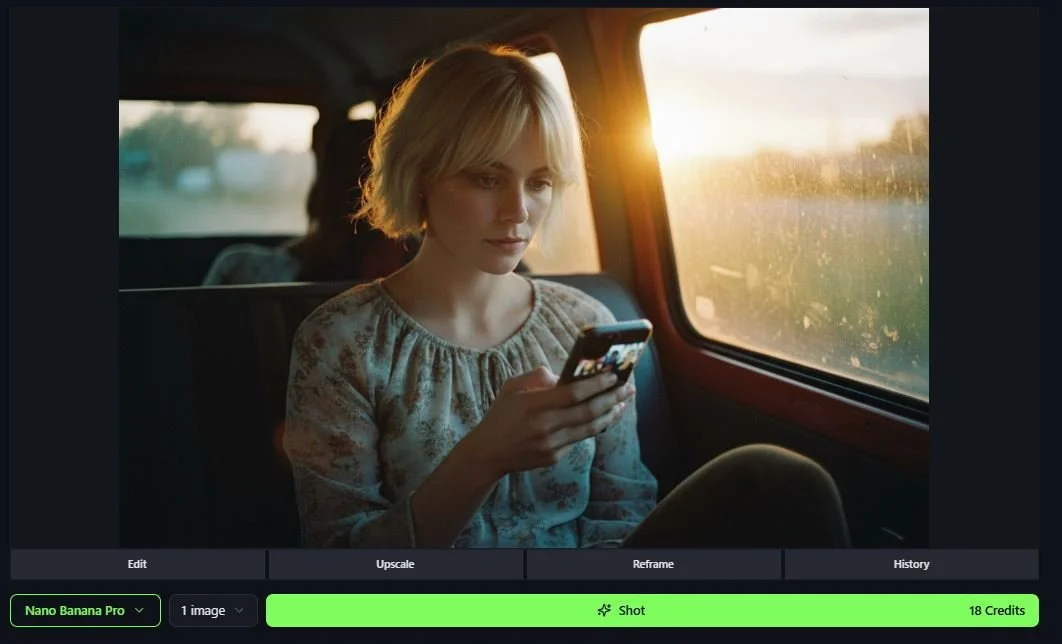
Review the image created. You can often regenerate an image or edit its underlying prompt if you are not happy with the results. Your storyboard image is what is used to create the video, so it's very important this image aligns with your vision when it turns into video.
Note: The various features listed below have been captured in greater detail in the Editing Images Section.
Editing Shot Images: To make edits to an existing Shot Image, click on the Edit button under the image. This will open a menu that will let you generate a similar image with a change to it.
Upscale Shot Images: To upscale a Shot image, click on the Upscale button under the image. This will open a menu that will allow you to upscale the image and make other changes to it. You will see options to use Magnific Upscaler for creative or precision.
Reframe Shot Images: Reframe can help you adjust the Aspect Ratio of an image. To reframe a Shot image, click on the Reframe button under the image. This will open a menu that will allow you to reframe the image to your liking.
Adjust Shot Images: This tool allows you to manually zoom in and crop your images. To adjust an image, click on the Edit button under the image and then click on the Adjust button on the right side of the Image Edit menu.
Generation History: Once you’ve generated at least one image, you will see a History button appear under the image that allows you to look back through all images you have generated for this particular shot. The history also contains the prompt that was used to make that generation.
You can navigate to other shots using the arrows on either side of the panel or by clicking Back to Storyboard.
Once you are happy with your results, you can move to the next Storyboard image, or you can turn the image you just made into a video.
Section 2: Editing Shot Images
Section 3: Generate Video
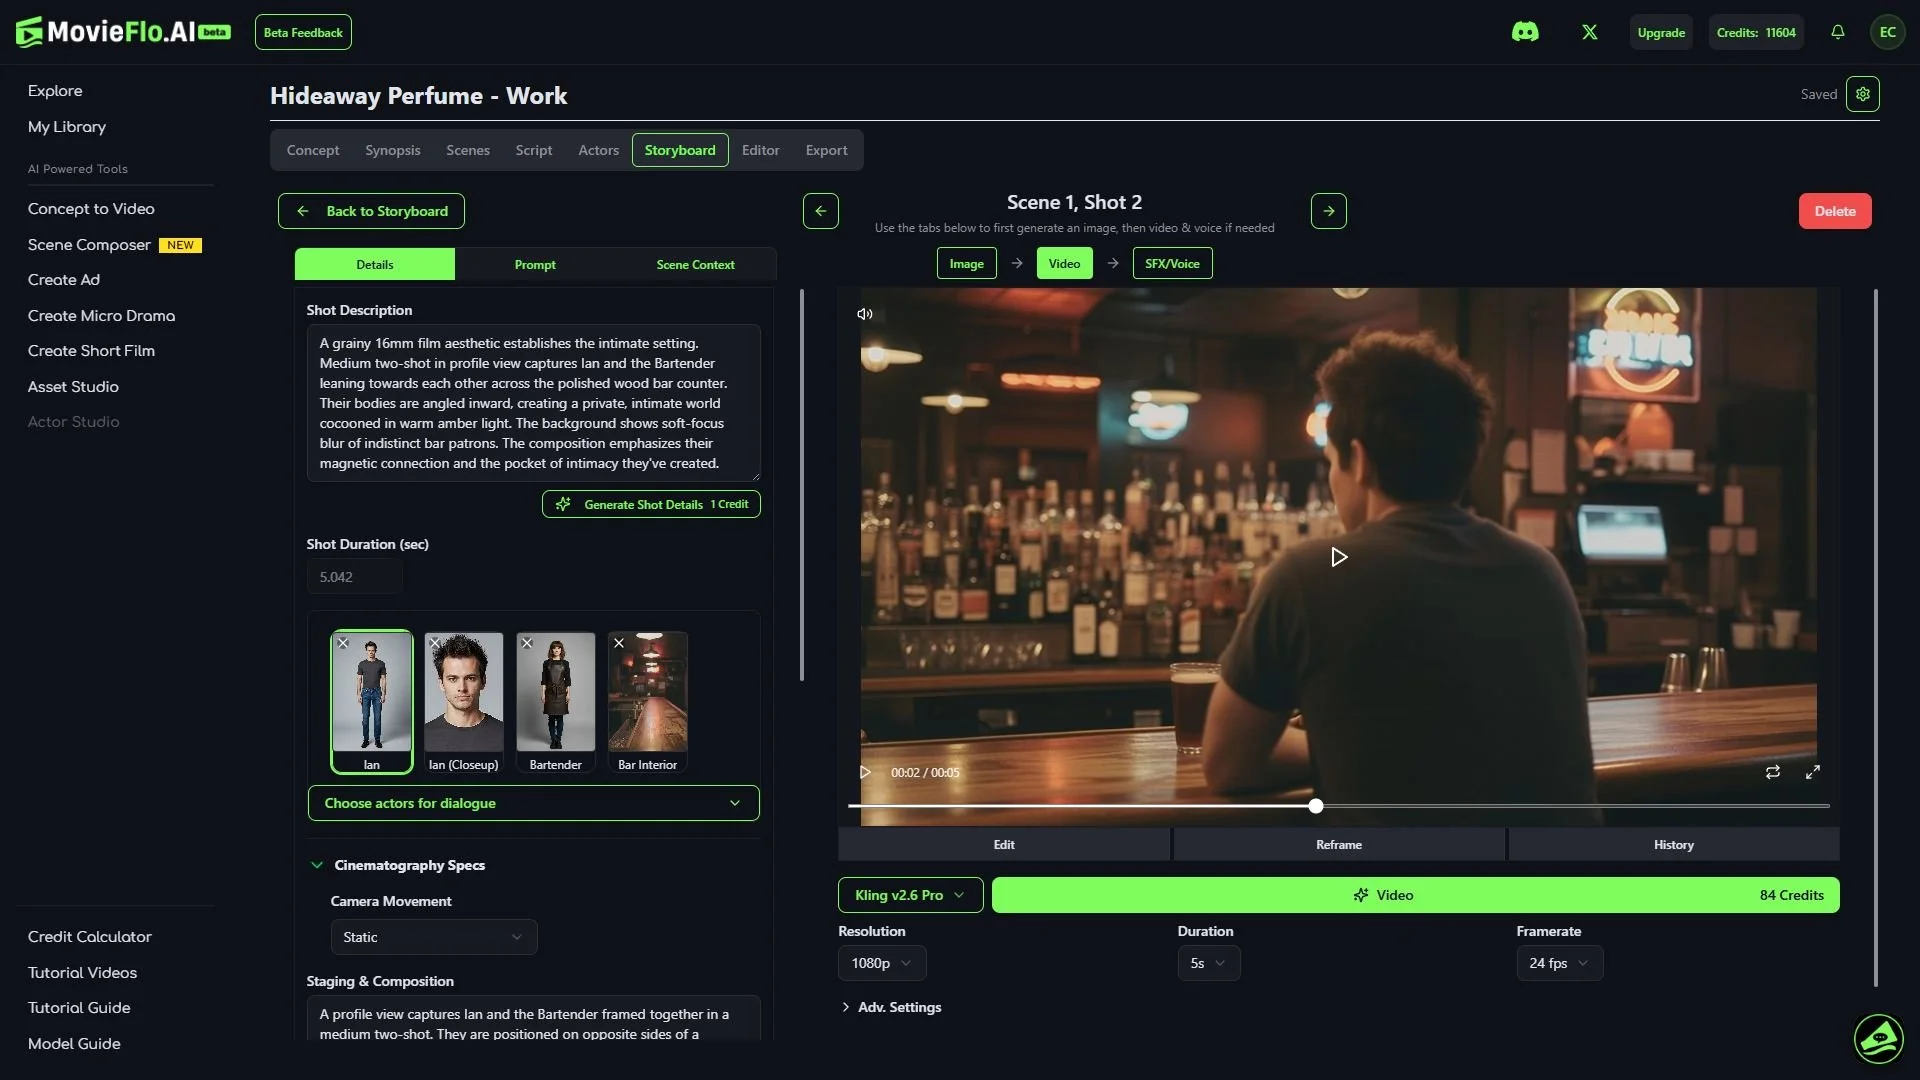
Once you are happy with your Shot image, click on the Video button to generate a video based on your image. The button is located just above the Shot Image, to the right of the Image button.
Details - Like the Image section, this is where your video prompt is crafted. It will be automatically filled in from your story. You can create new shots or edit existing ones.
Shot Description - Basic description of what is happening in the shot. Changes made here can affect the prompt if you click Regenerate Prompt afterward.
Camera Movement - Choose the type of camera movement in the shot.
Choose Actors for Dialogue - Here you can choose the Actor that you want to be speaking in the video that will be generated.
Dialogue - If the script calls for any dialogue, it is listed here. It should be automatically associated with the actor that is speaking. You can alter this dialogue, as desired. You can also remove or add dialogue to shots.
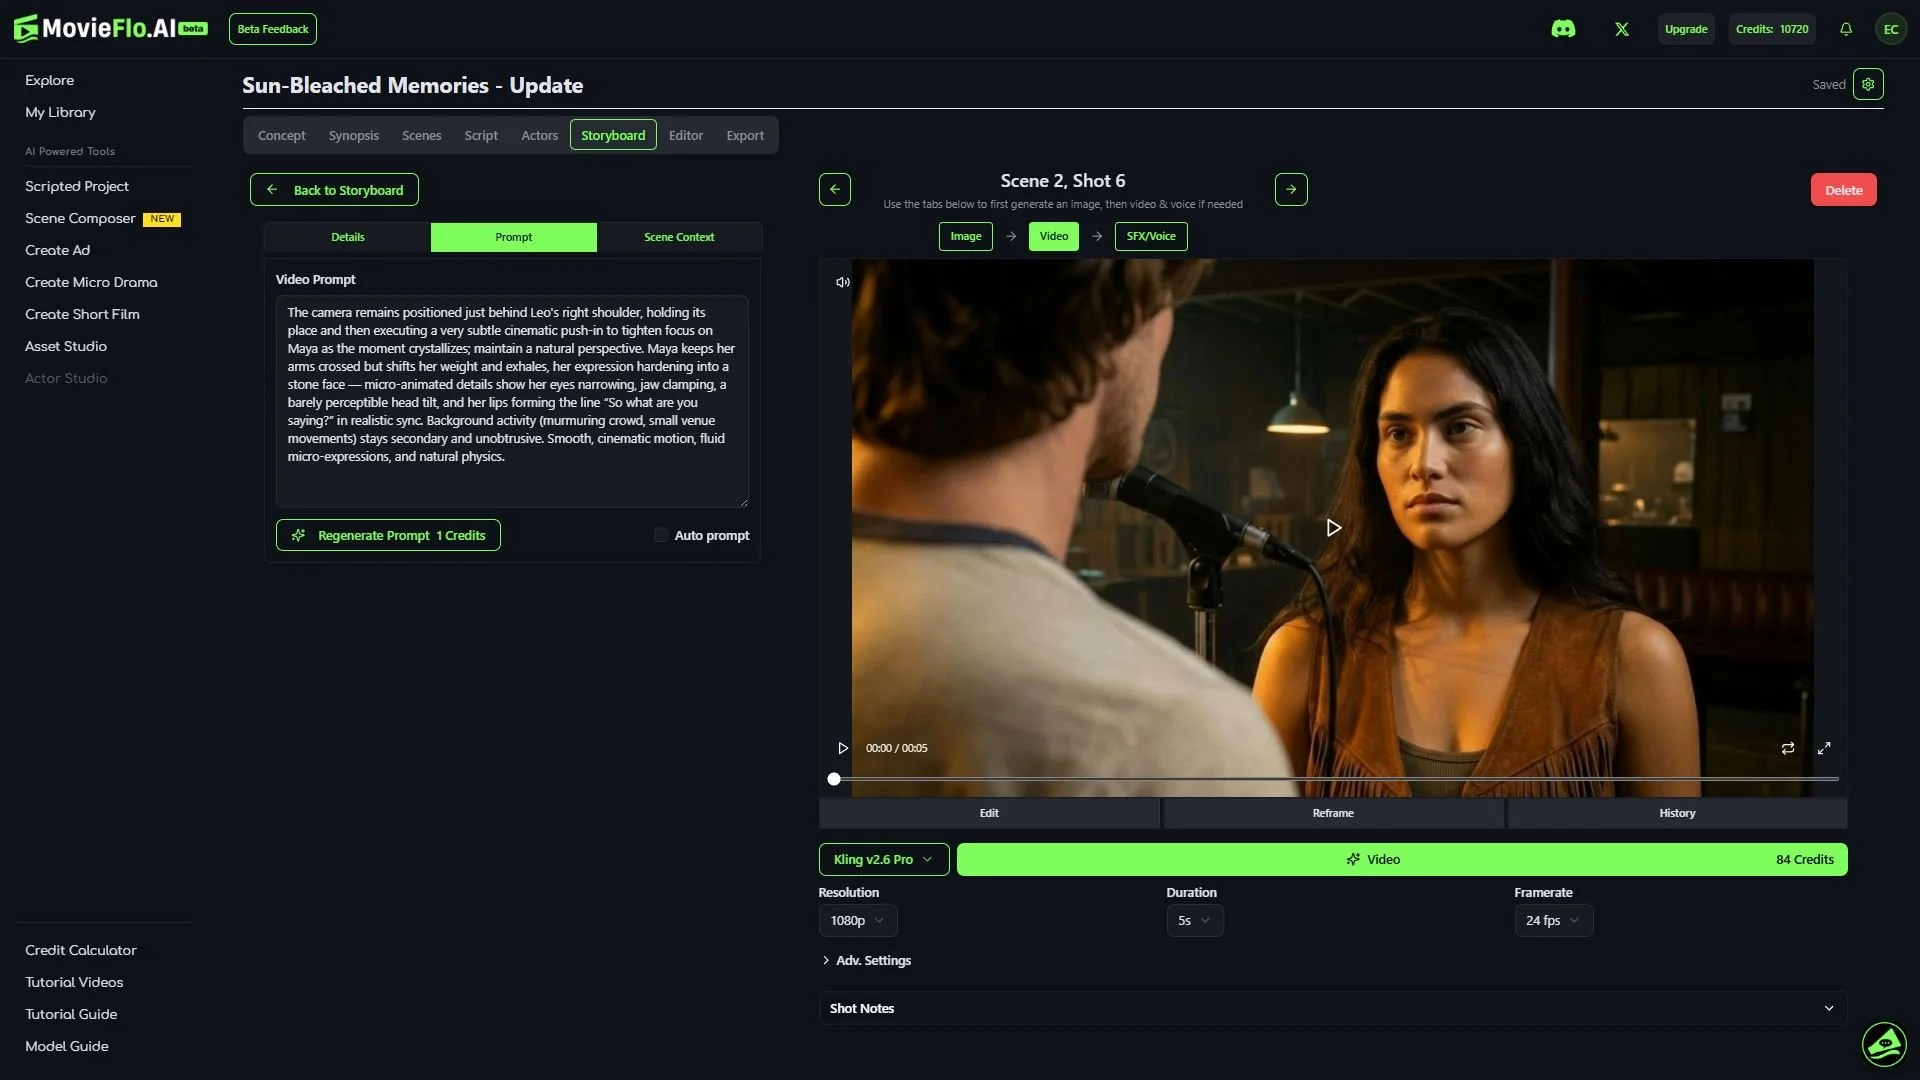
Prompt Tab
Video Prompt - The video prompt is used to turn your images into videos. The prompt describes Camera Movement and other actions of the shot. The clearer and more specific your prompt, the closer the AI will get to the video you imagined
Auto Prompt - When this box is checked, the Video Prompt will be automatically regenerated, if needed, when you make changes such as changing the video model. This ensures that you will be able to generate the video you intended. The Video Prompt can also be regenerated using the Regenerate Prompt button if you would like to do this manually.
Scene Context - While this section cannot be edited here, it explains what is going on in the entire scene. If you decide you want to edit this, it can be done under the Scenes tab for each individual scene in your project.
Video Models - The current default video model is Kling 2.5 Turbo. You can use the pulldown menu to choose from a plethora of the latest video models. It is important to keep in mind each model has its own credit costs associated with them, based on a number of factors such as length of the clip, resolution and more. The credit cost is displayed for each model on the right of the (Generate) Video button.
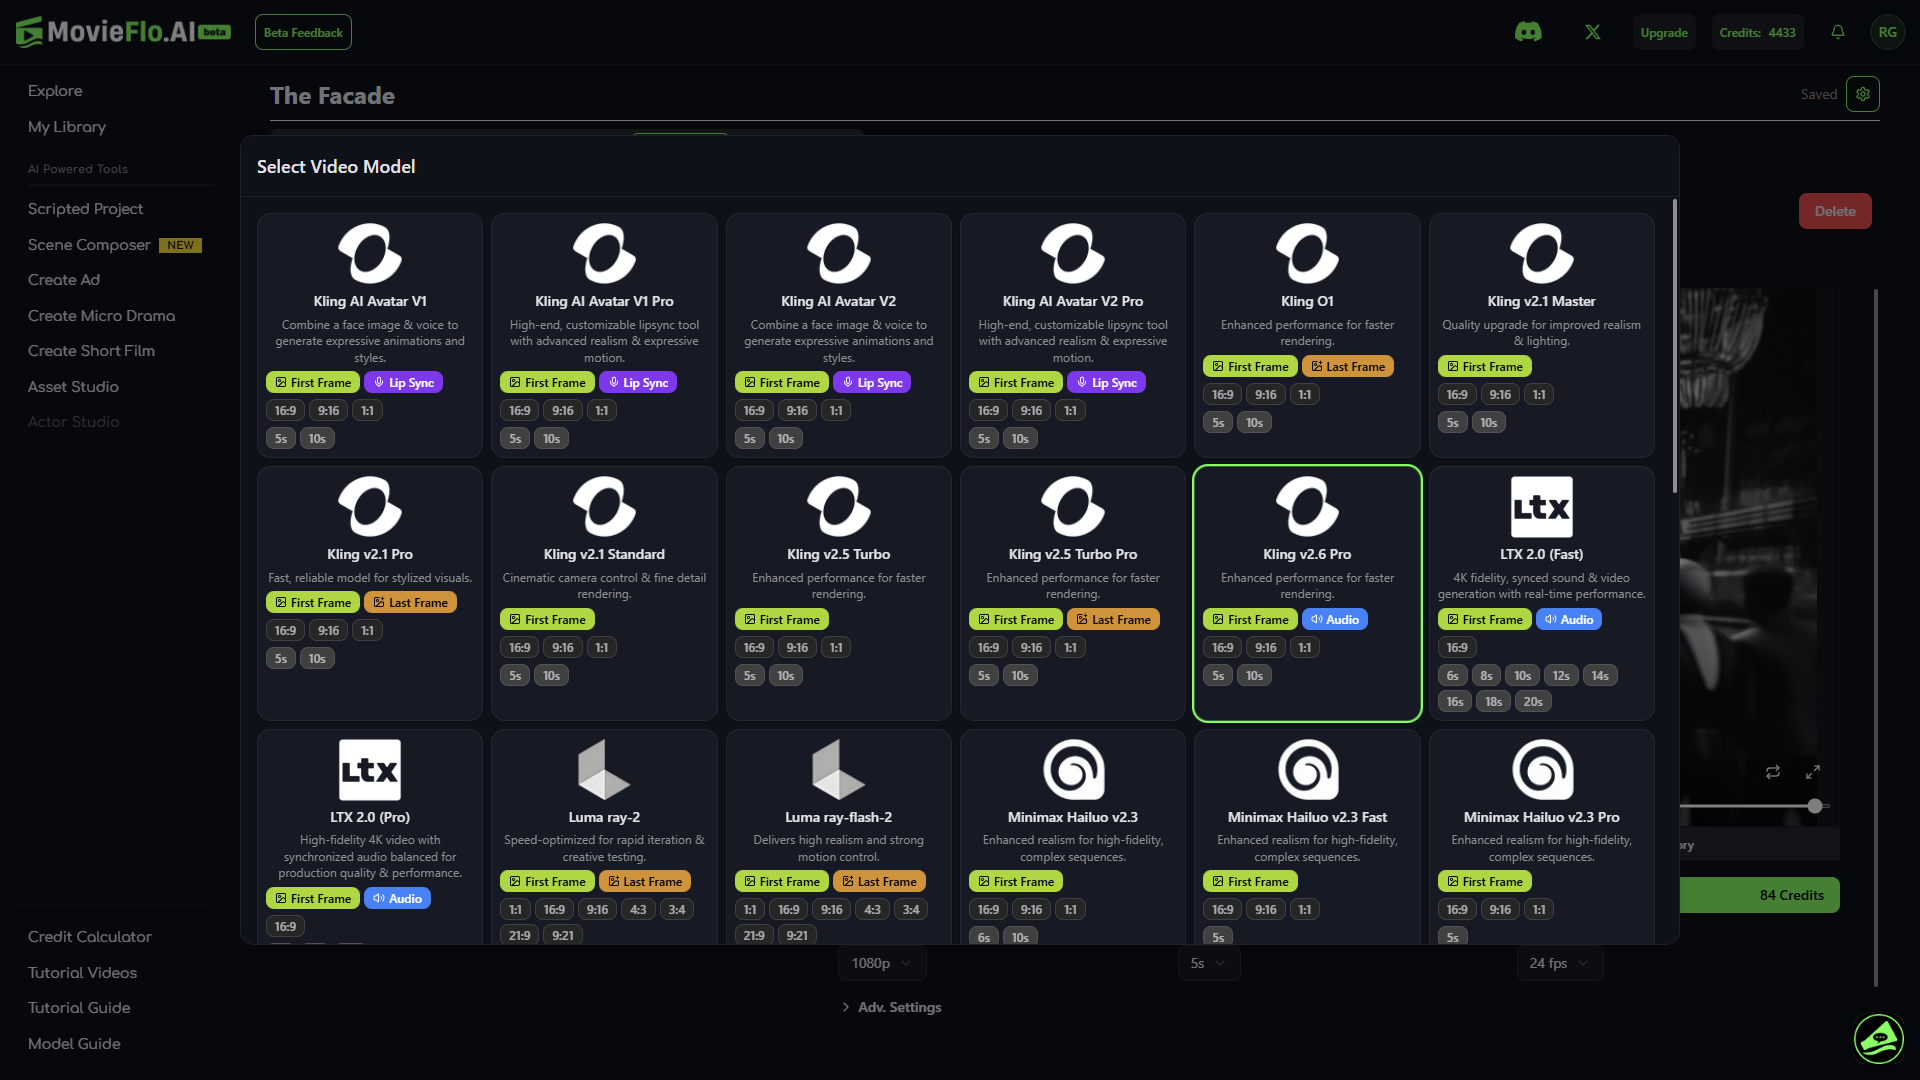
Adv. Settings - For advanced users. Options available vary depending on the video model being used.
Shot Notes - This is simply a field for adding your own notes for a given shot as needed.
Generate Video - Once you are happy with your image and video prompt, select the (Generate) Video button and wait for the video to generate.
Section 4: Editing Videos
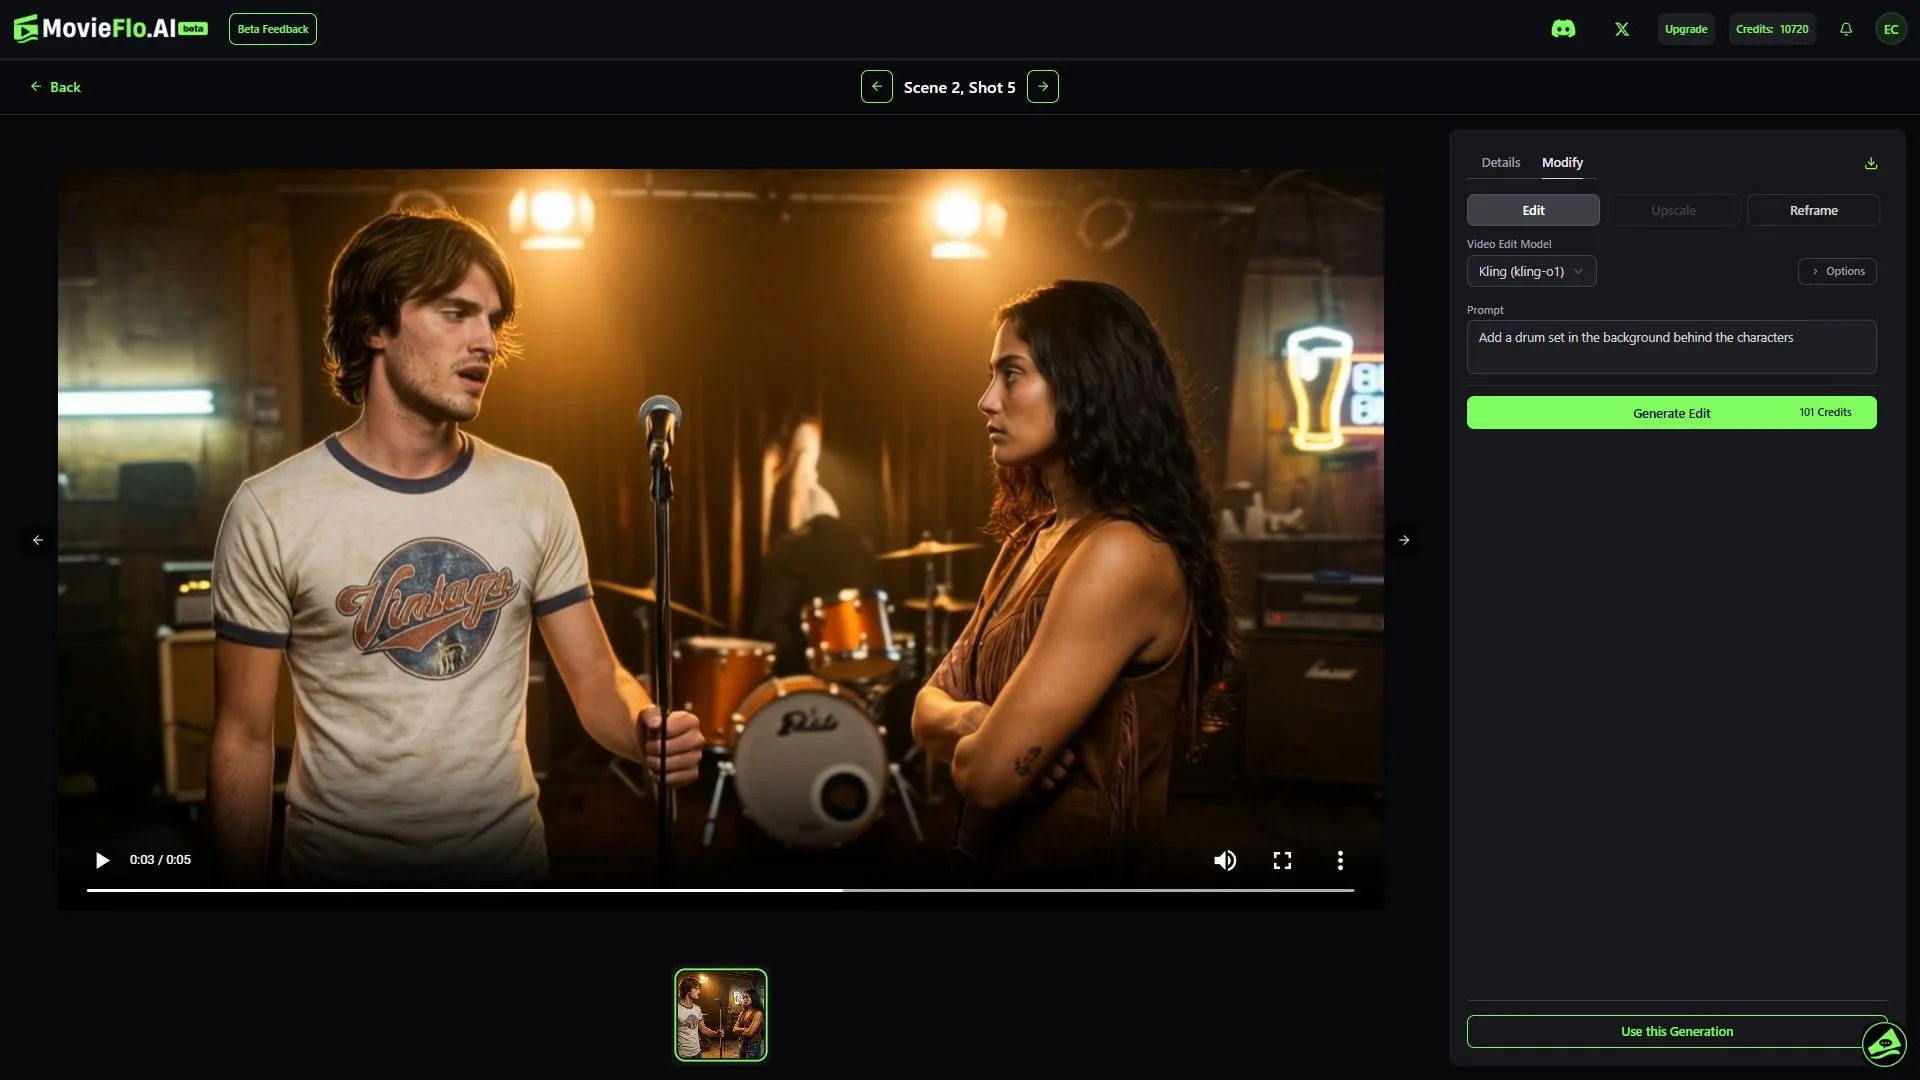
Editing Generated Videos - To make edits to an existing video, click on the Edit button under the video. This will open a menu that will let you generate a similar video with a change to it. Editing Videos is a new but powerful feature. Watch our tutorial on it here.
Reframe Videos: To reframe a video for a different aspect ratio or different cropping, click on the Reframe button under the video. This will open a menu that will allow you to reframe the video to your liking.
Generation History - Once you’ve generated at least one video, you will see a History button appear under the video that allows you to look back through all videos you have generated for this particular shot. The history also contains the prompt that was used to make that generation
Section 5: Storyboard Preview Modes
Video/Shot Preview Modes:
Mouse-over shots from the main storyboard view and the videos will play if generated.
Preview Mode - Click on the Open Preview button in the upper left corner of the Storyboard menu to open Preview Mode.
Shot Names and Descriptions - See the shot name and description for any shot.
Auto-Play - Toggle on and off to play through your story automatically.
Edit Button - This pencil icon will open up the Edit View for any shot to work on it.
Timeline - On the bottom, jump to any shot by selecting it.
Step 8: Adding Sound
Lip Sync Via Video Models
There are multiple ways to create dialogue and lip sync with your characters in AI and with MovieFlo. This section covers video models which create lip sync videos from still images.
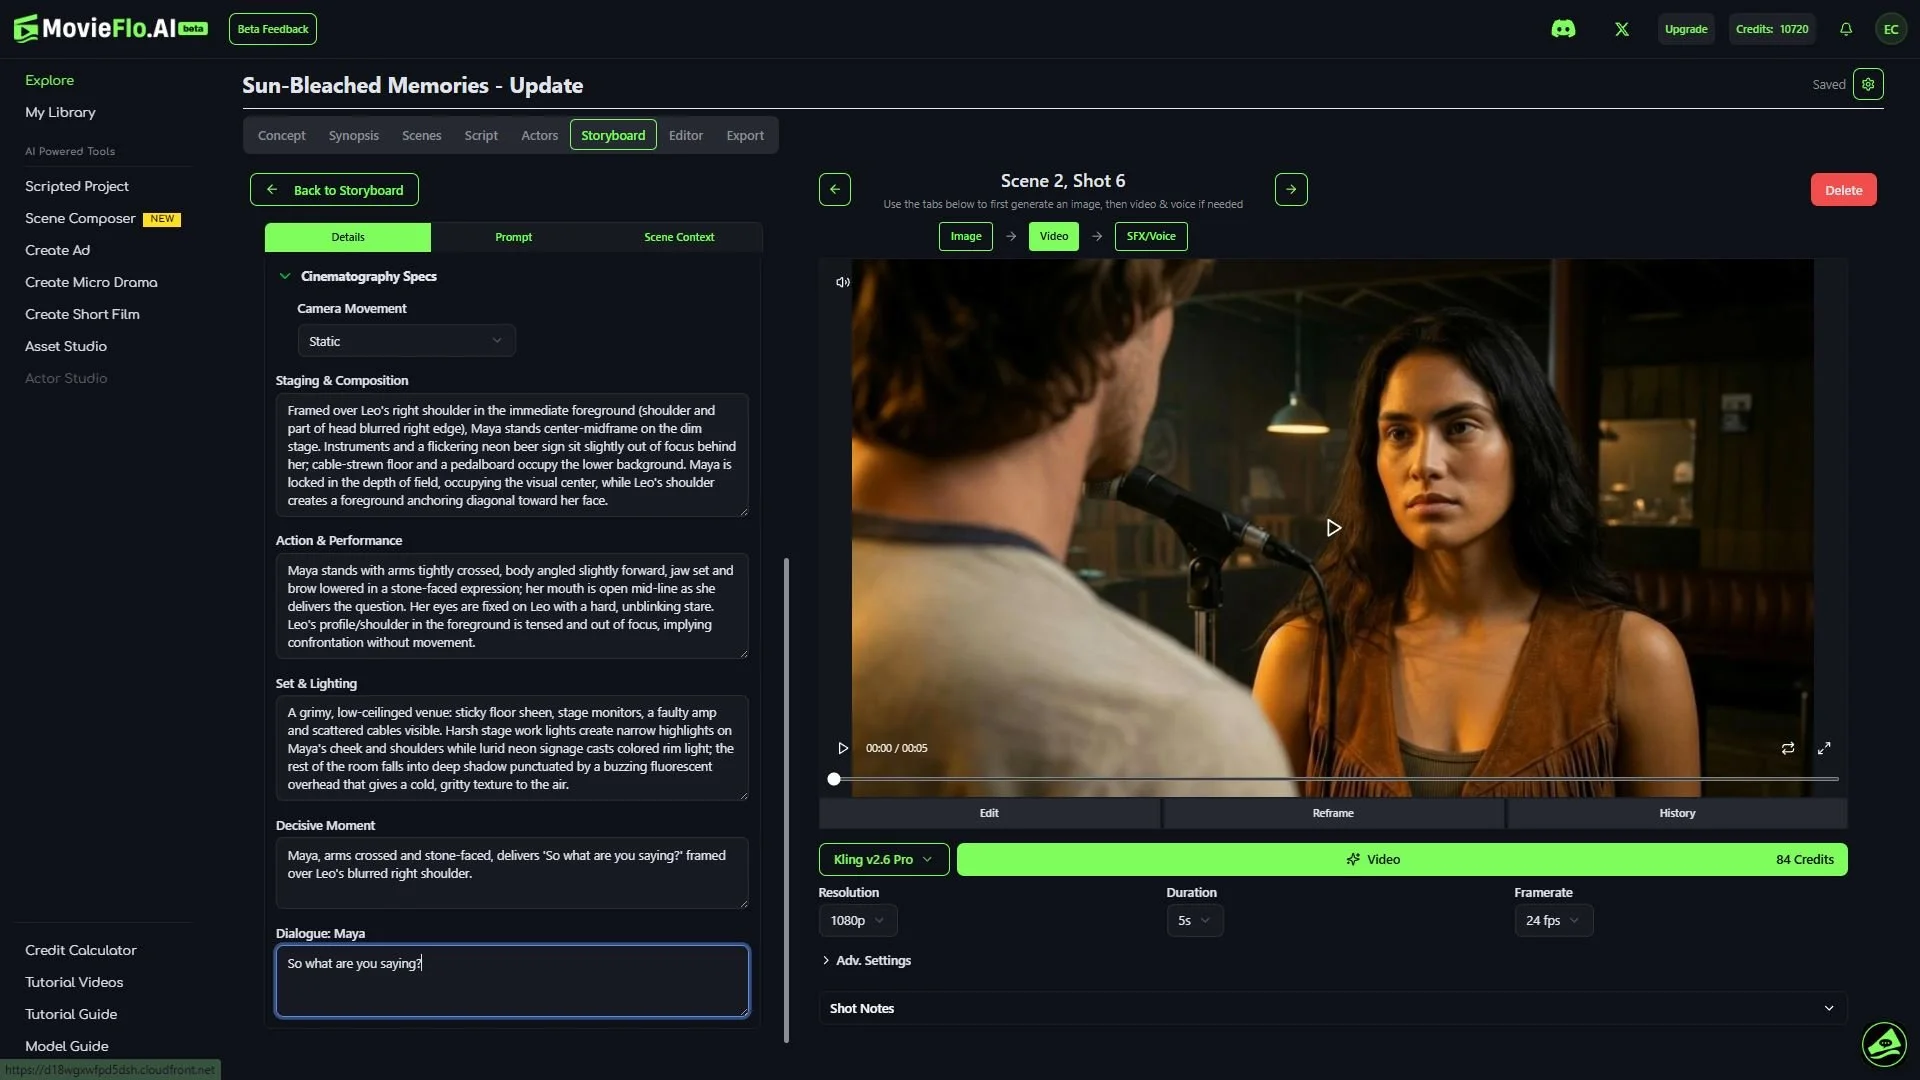
Image + Prompt - These models create dialogue and sound without any additional media. MovieFlo automatically write the dialogue into these prompts with the proper emotion for the actors for models such as Veo 3 & 3.1, Kling 2.6, MORE. These models produce possibly the best lip sync visually, but often they will change the voice or inflection shot to shot. In the latter case, you could go back and use Lip Sync Pro or another model to add in a consistent voice.
Image + Audio File - These are models such as Kling Avatar Pro and OmniHuman. These models allow you to upload or create a voiceover audio clip and then create a video from this and your still image. These models allow you to create longer clips based on the length of the audio.
SFX/Voice
You also have the option to create Lip Sync, Voiceover narration or Sound Effects from this section.
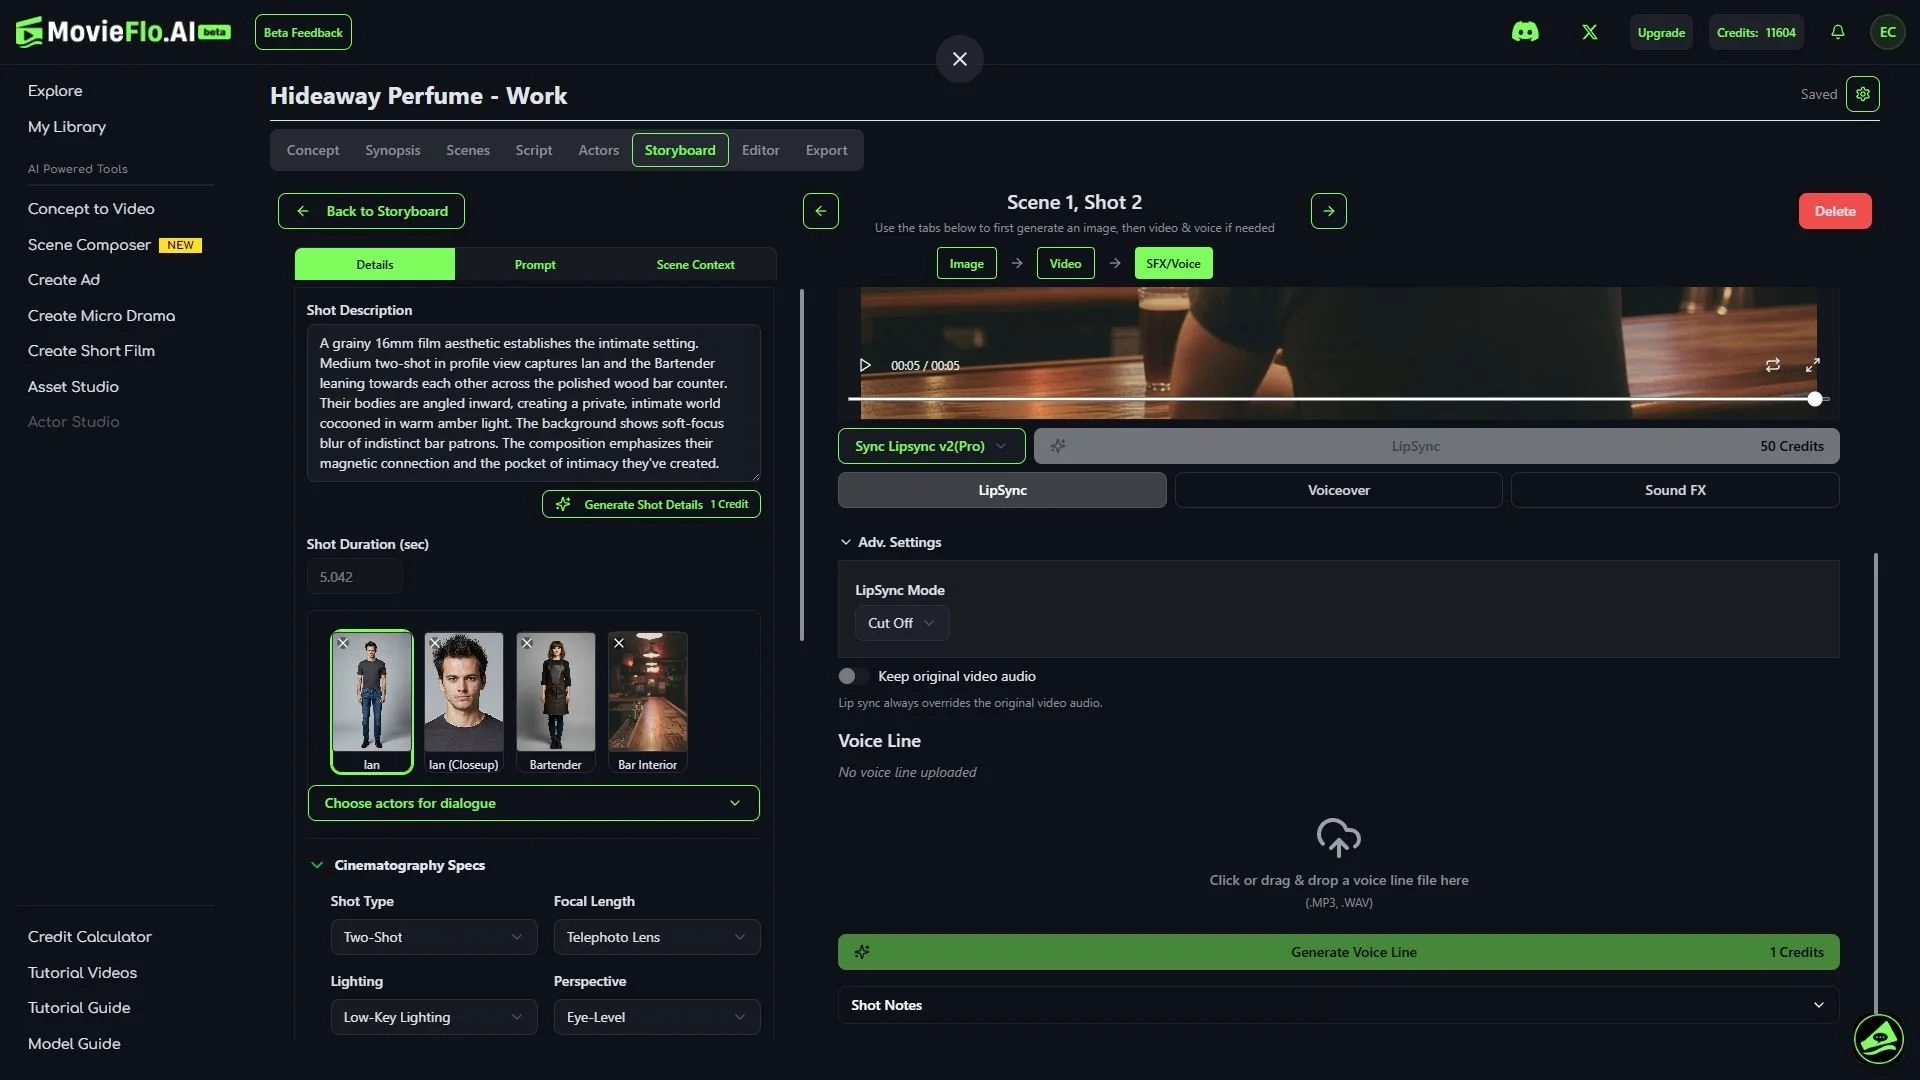
Lip Sync: Video + Audio = Video
These models use a finished video + an audio file to create a new video:
Model: Choose a model for lip sync or voiceover or sound effects.
Video: You must first have a video clip before you add lip sync.
Choose Actors for Dialogue: Verify the correct actor has been assigned the Dialogue. You can see the name next to the designated actor, also the actor image will be highlighted.
Actor Voices: You must either have pre-selected a voice for your actor in the actors section or upload a voice (see below).
Keep original video audio: This allows you to preserve existing audio already embedded in your clip where applicable.
Advanced Settings: The Lipsync v2 and Lipsync v2(Pro) models offer a feature called “LipSync Mode” under the Adv. Settings section. Here is an explanation of the different modes found in the drop down menu:
Cut Off: If the audio is longer than the video, this mode simply cuts off the end of the audio to match the video's length. The AI then only syncs the portion of the audio that fits within the original video.
Loop: If the audio is longer, this mode loops the video footage to fill the duration of the audio. The AI will then apply the lipsync throughout the extended, looped video.
Bounce: Similar to a boomerang effect, this mode plays the video forward and then in reverse to fill the duration of the audio track. The lipsync is applied across this extended, back-and-forth video.
Silence: This mode is used when a video needs no dialogue. It can be explicitly used to prevent any lipsync from being generated, effectively forcing the character's lips to remain closed and silent.
Remap: This mode is a more advanced setting that allows for more precise control over the timing of the video and audio. It can be used for time remapping within video editing software, matching specific parts of an animation to different audio elements.
Upload Voices: Alternatively, you can upload .wav and .mp3 files of your voiceover lines.
Generate Voice Line: This is a critical important step! If you don’t upload your own file, you need to generate the voice line that says the dialogue first. Click Generate Voice Line to do this. Once generated, you can press the play button to test it out.
Generate Lip Sync: Click the (Generate) Lip Sync button. You should hear and see your line playing in the video. As with standard video, you can zoom in to get a closer view of it.
Voiceover
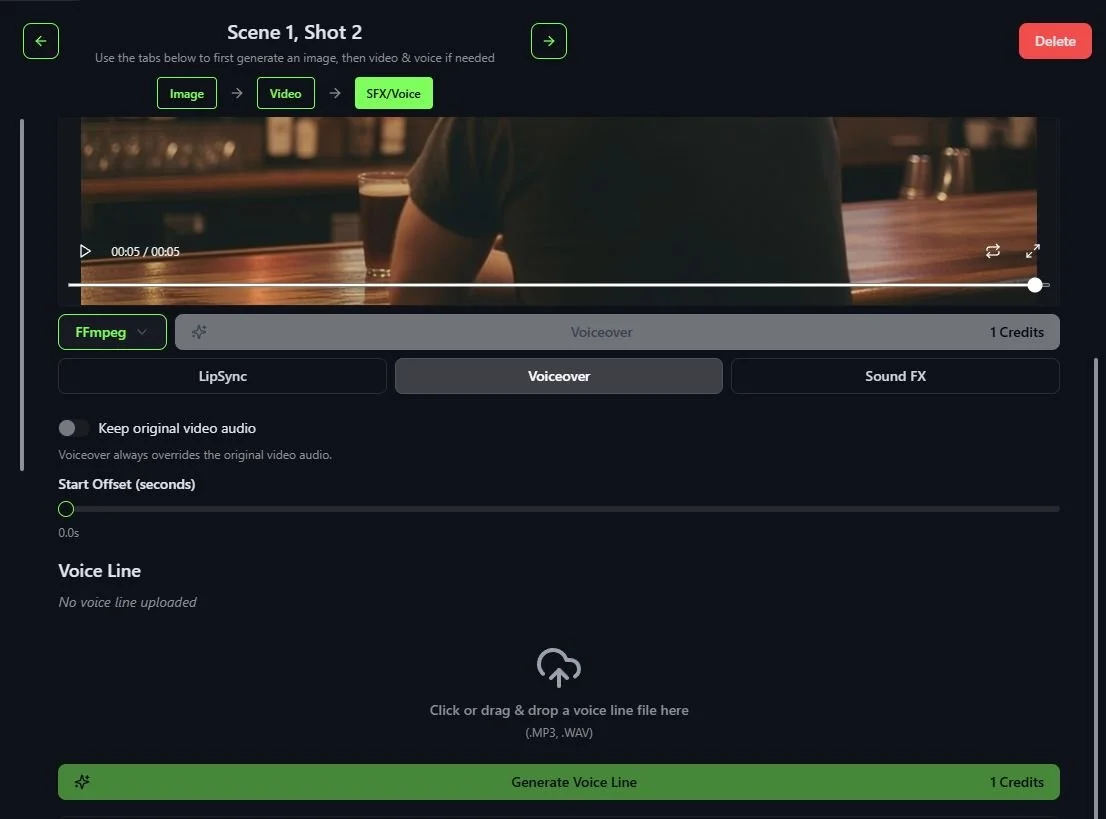
Enter the Actors menu and click on the Create Actor button. You can name the actor “Narrator”, for example. Other information such as Description does not need to be filled out, but remember to add a voice type for this new actor.
Enter Storyboards and click on any shot you want to have a voiceover.
Click on “Choose Actors for Dialogue” and select the Actor you just created. This will allow you to add Dialogue for this Actor, even though they will not physically appear in the video you generate.
After entering the dialogue text, generate an image and video for the shot if you have not done so already.
Click on the SFX/Voice tab and then click on the Voiceover button under the video.
If you want to preserve any existing audio in the clip, click Keep Existing Audio.
Click on the Generate Voice Line button and the text you entered into the Dialogue box will be generated as a new voice line.
Finally, click on the Voiceover button to generate a new video with the voiceover.
Sound FX
Important Note: There are two ways to generate sound effects:
In the Storyboards - SFX/Voice tab: Here you can generate sound effects for any shot that has a video.
In the Video Editor: In the left side panel in the Editor, there is a Generate button where you can generate both sound effects and music for your project. These are not tied to any one shot in your Storyboard.
Generating Sound Effects in the Storyboards - SFX/Voice Tab:
Model: There are currently two models to choose from, Pixverse and Mirelo SFX v1.
Keep Original Video Audio: Enable this option to preserve the video's original audio beneath added sound effects.
Sound Effect Prompt (optional): You can enter specifics about the sound effects you would like to add to your video here.
Duration (available only with Mirelo SFX v1): Select the duration of the video to be generated.
When you have the options set to your liking, you can generate a new video with sound effects by clicking on the (Generate) Sound FX button.
When you are happy with your storyboard images and video clips are generated, click Editor.
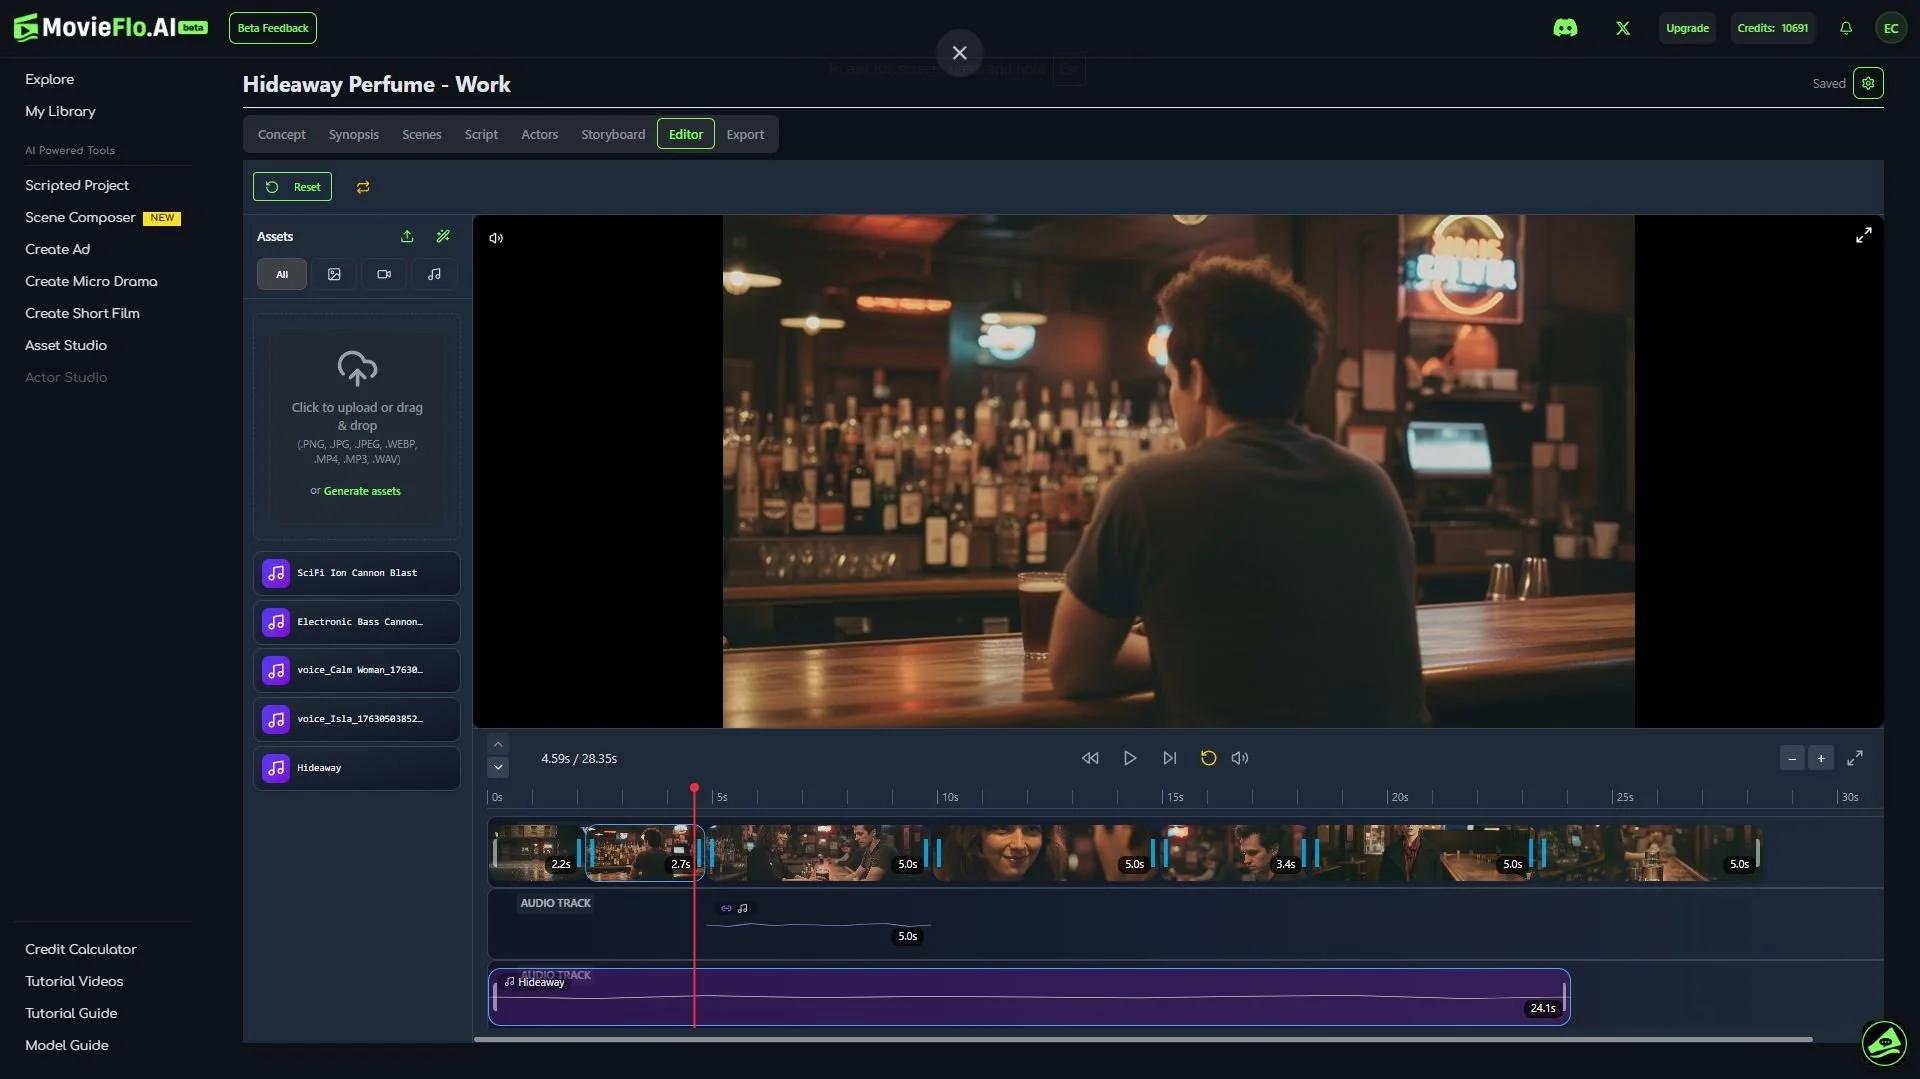
Step 9: Video Editor
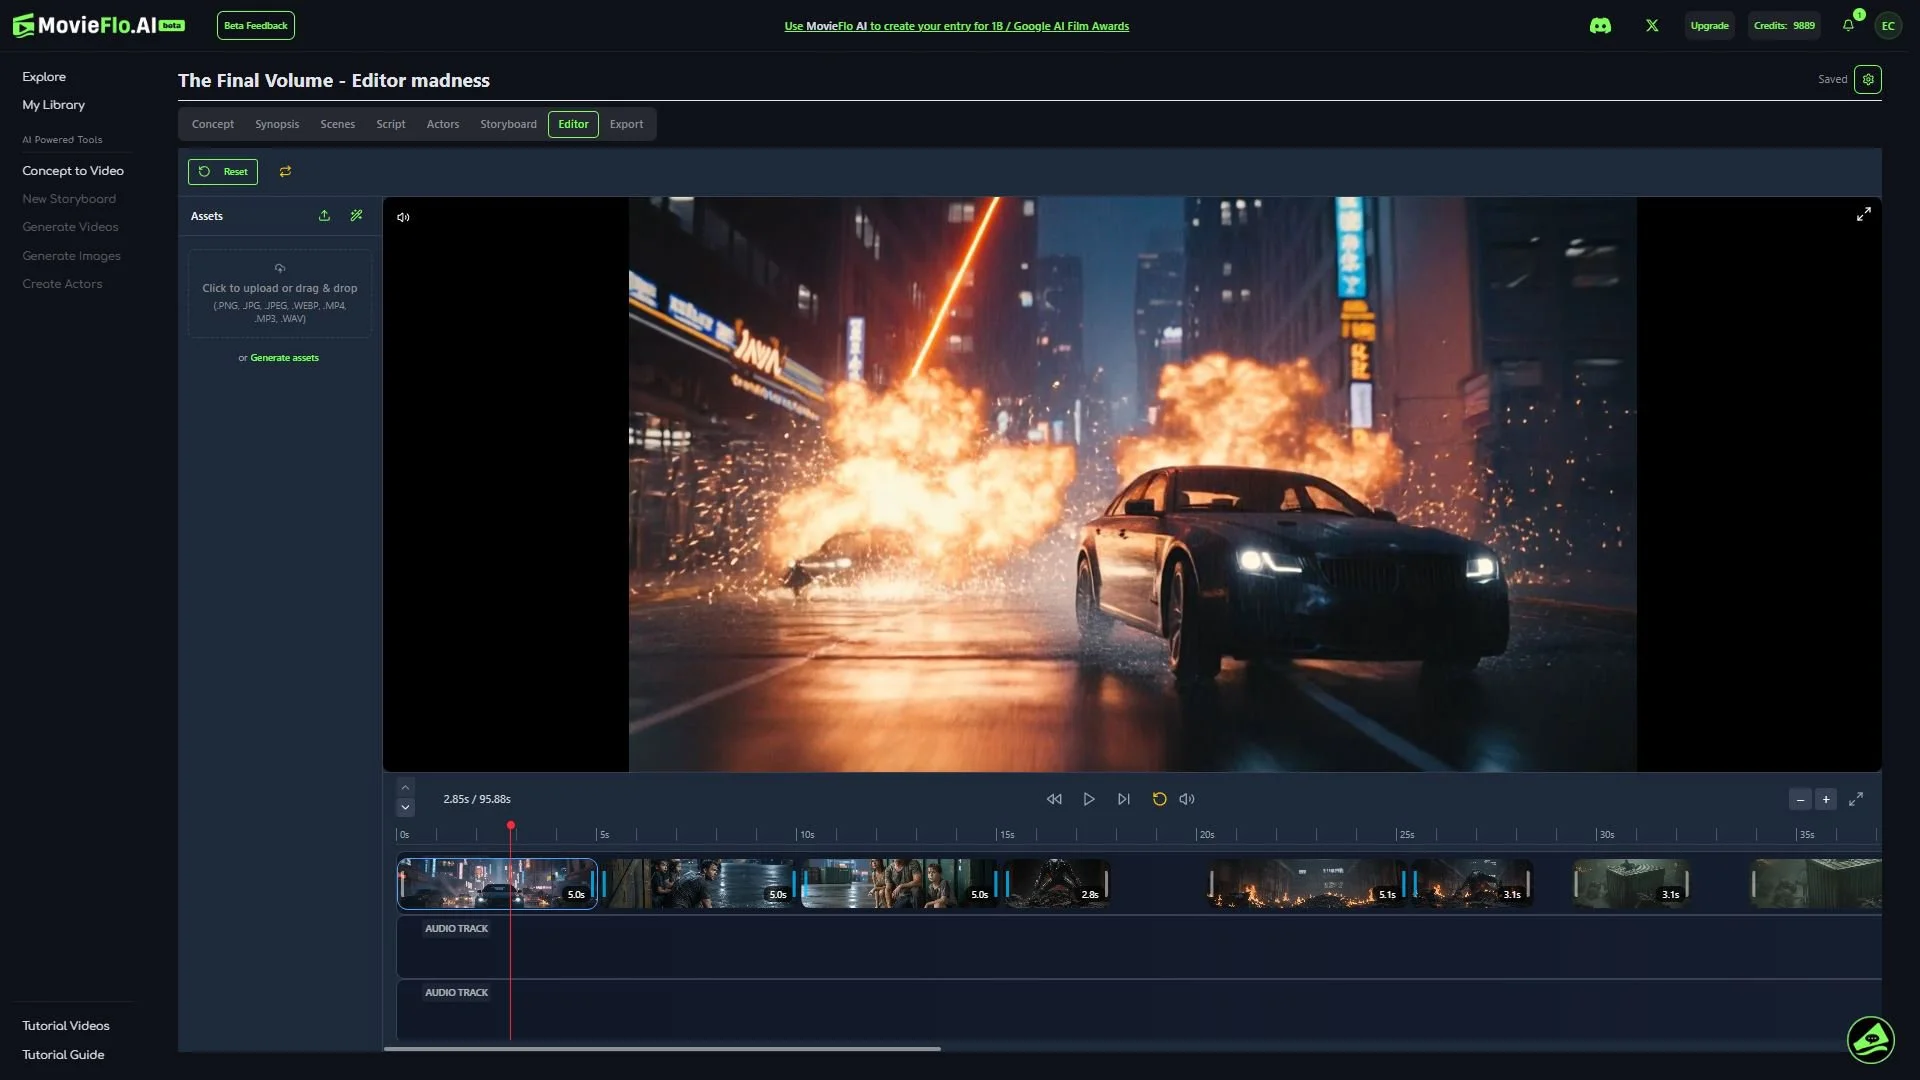
The Video Editor allows you to make basic trims and edits to your video, plus add Sound Effects or Music. You can then export your Story to an established video editing app such as Adobe Premiere, FinalCut, CapCut, Etc.
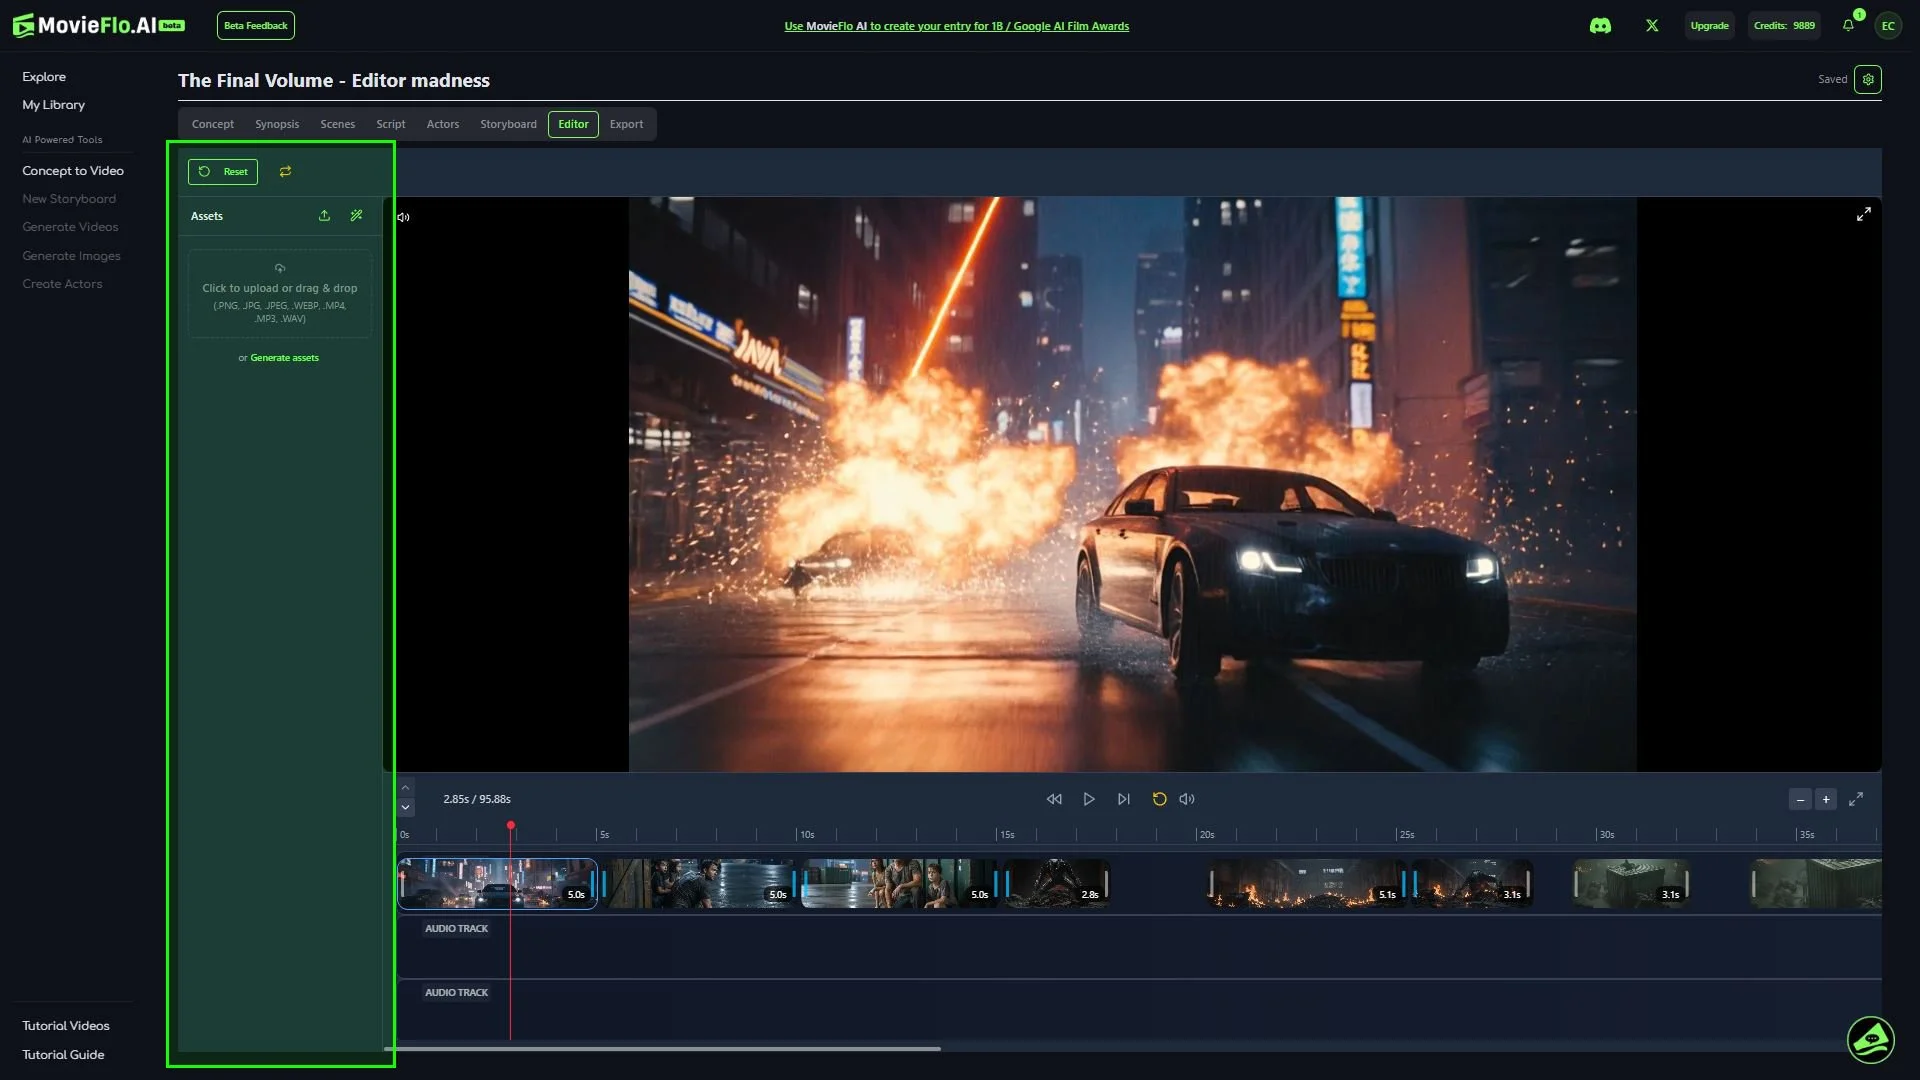
Timeline: When you enter the Editor, your storyboard images and movies will already be sequentially laid out for you in the timeline.
Trim Clips: Adjust the out points (in point coming soon) of each clip to refine pacing, cut unnecessary frames, and tighten the rhythm of your story.
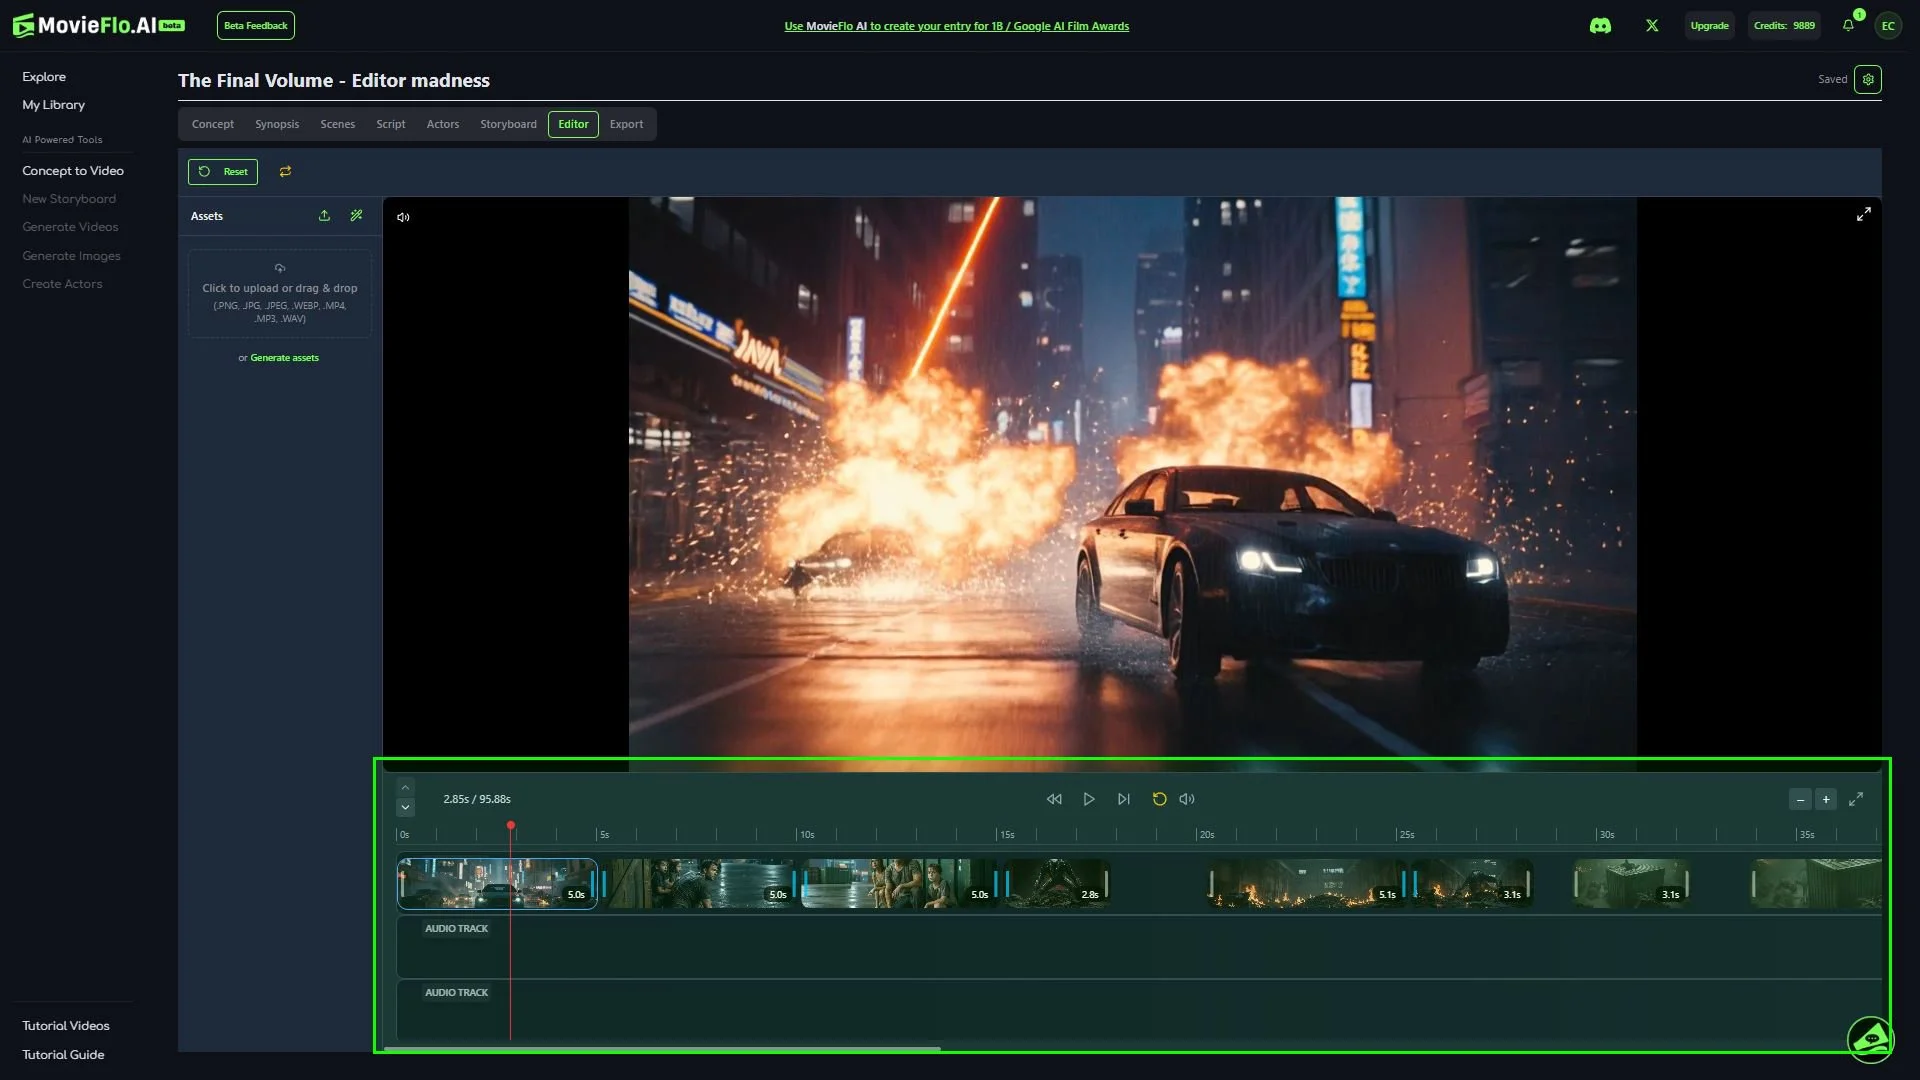
Assets Section
On the left side of this screen is the Asset Section.
Add/Delete Audio Tracks: You can add additional audio tracks by clicking on the + button on the left, bottom corner of the default audio track. You can also choose to delete an audio track by clicking on the trash can button in the left, top corner. Additional audio tracks can be used to add music and sound effects uploaded or generated into the Editor.
Uploading Assets: You have the option of uploading images, videos and audio clips which can be inserted into the video track or audio tracks.
Generating Assets: Sound effects and music can be generated and inserted into any of the audio tracks.
Adjusting Volume: Each audio clip, whether it was generated or uploaded, has a volume control slider. In addition, each of the tracks in the timeline has a master volume control slider for all of the clips in a track that can also be adjusted.
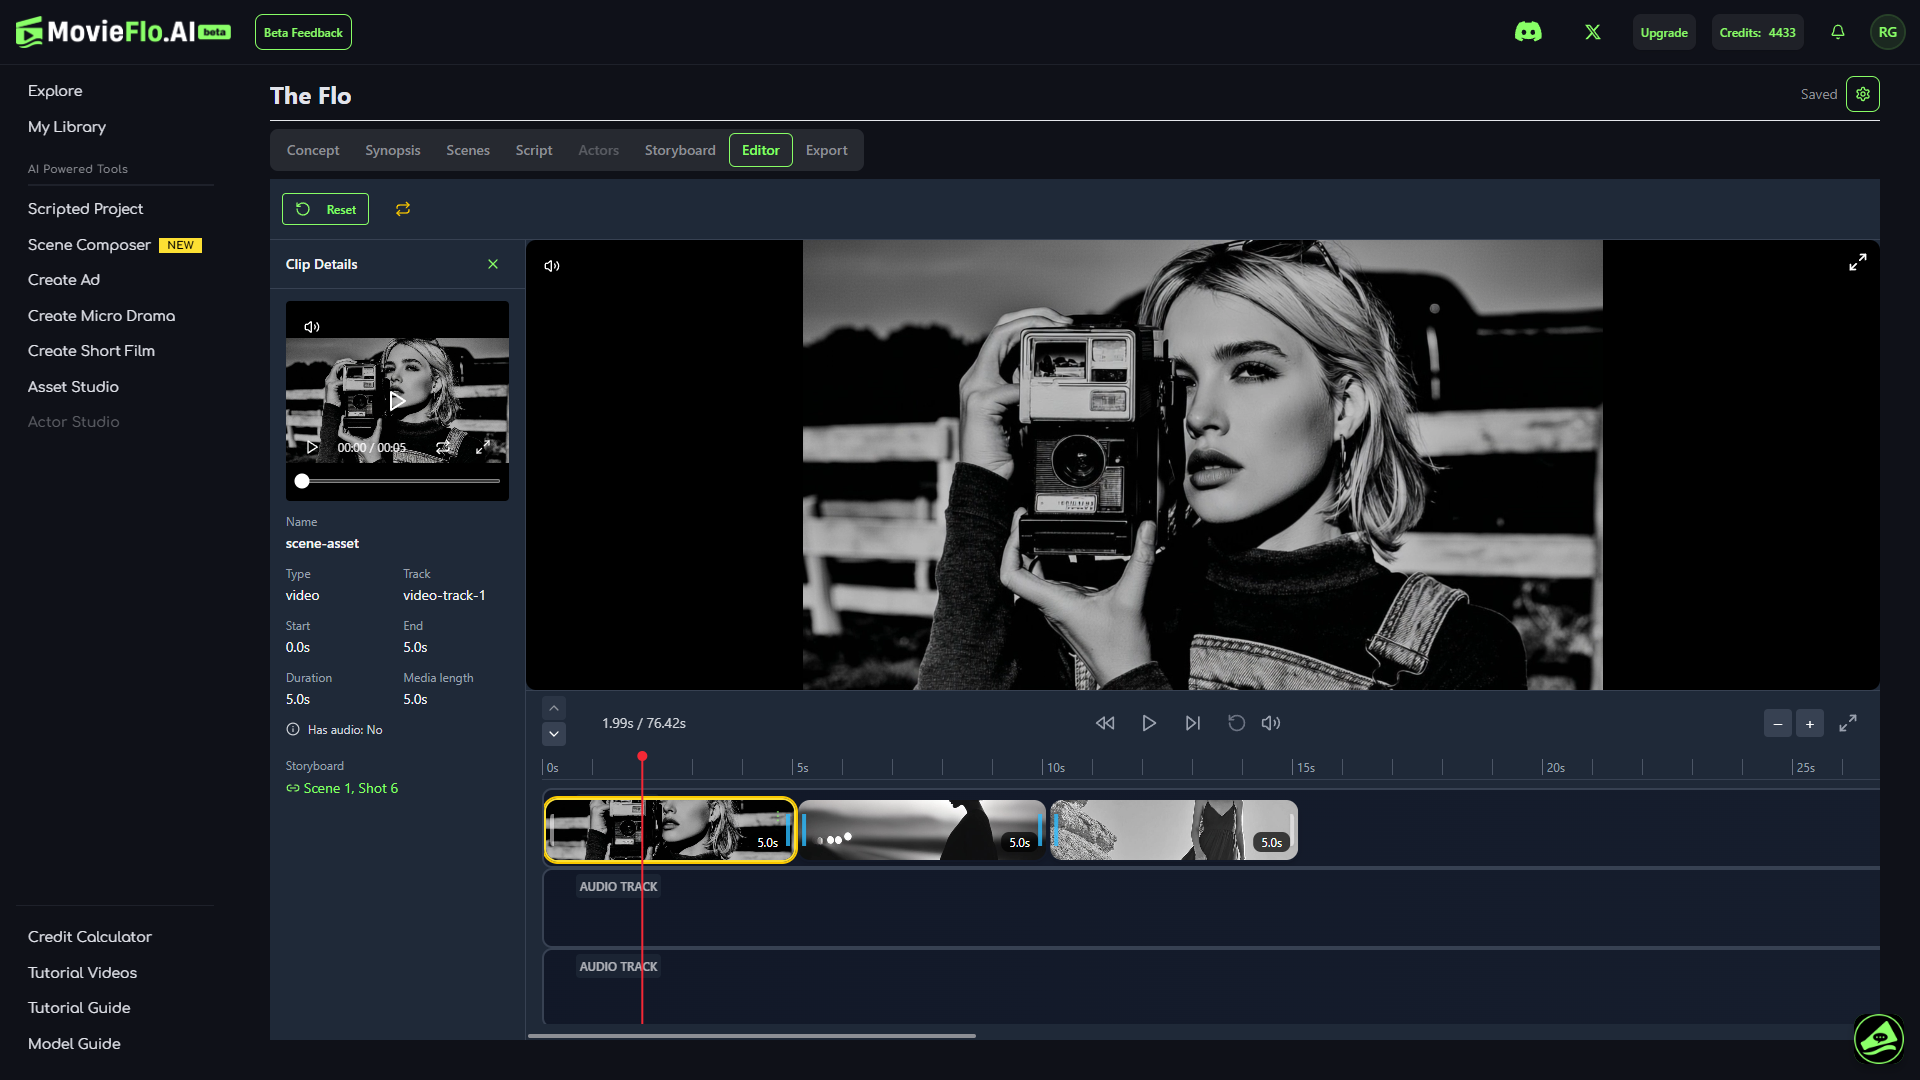
Note: When a clip is selected in the Timeline, the details for that clip are displayed in the Assets Section.
Preview Your Movie: Play back your timeline to ensure everything aligns, from cuts and transitions to music and mood.
SFX and Music in the Editor
In the Video Editor, there is an option to generate new sound effects and music that can be inserted into an audio track. There are two ways to access the Generate Assets menu:
Click on the Generate button located on the right side panel. You will see this button to the right of the Upload button.
Click on the green text that reads, Generate Assets in the right side panel.
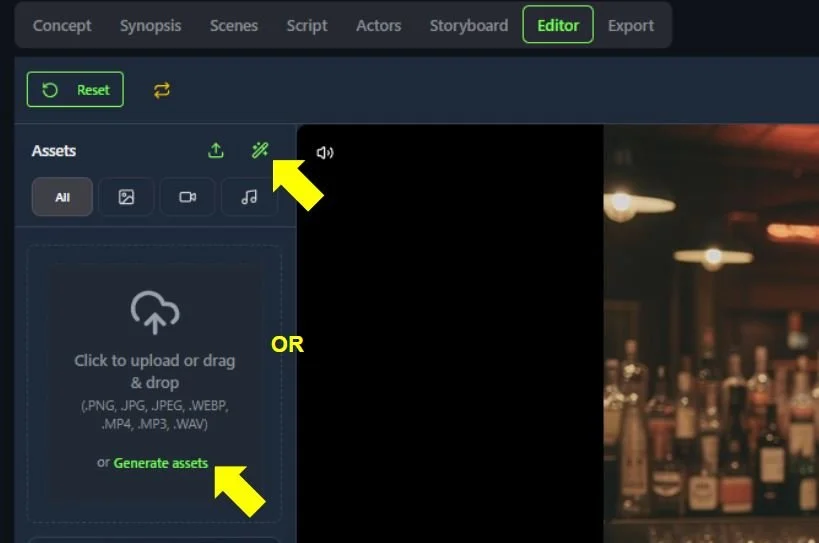
In the Generate Assets menu, you will find options to generate both Sound Effects and Music.
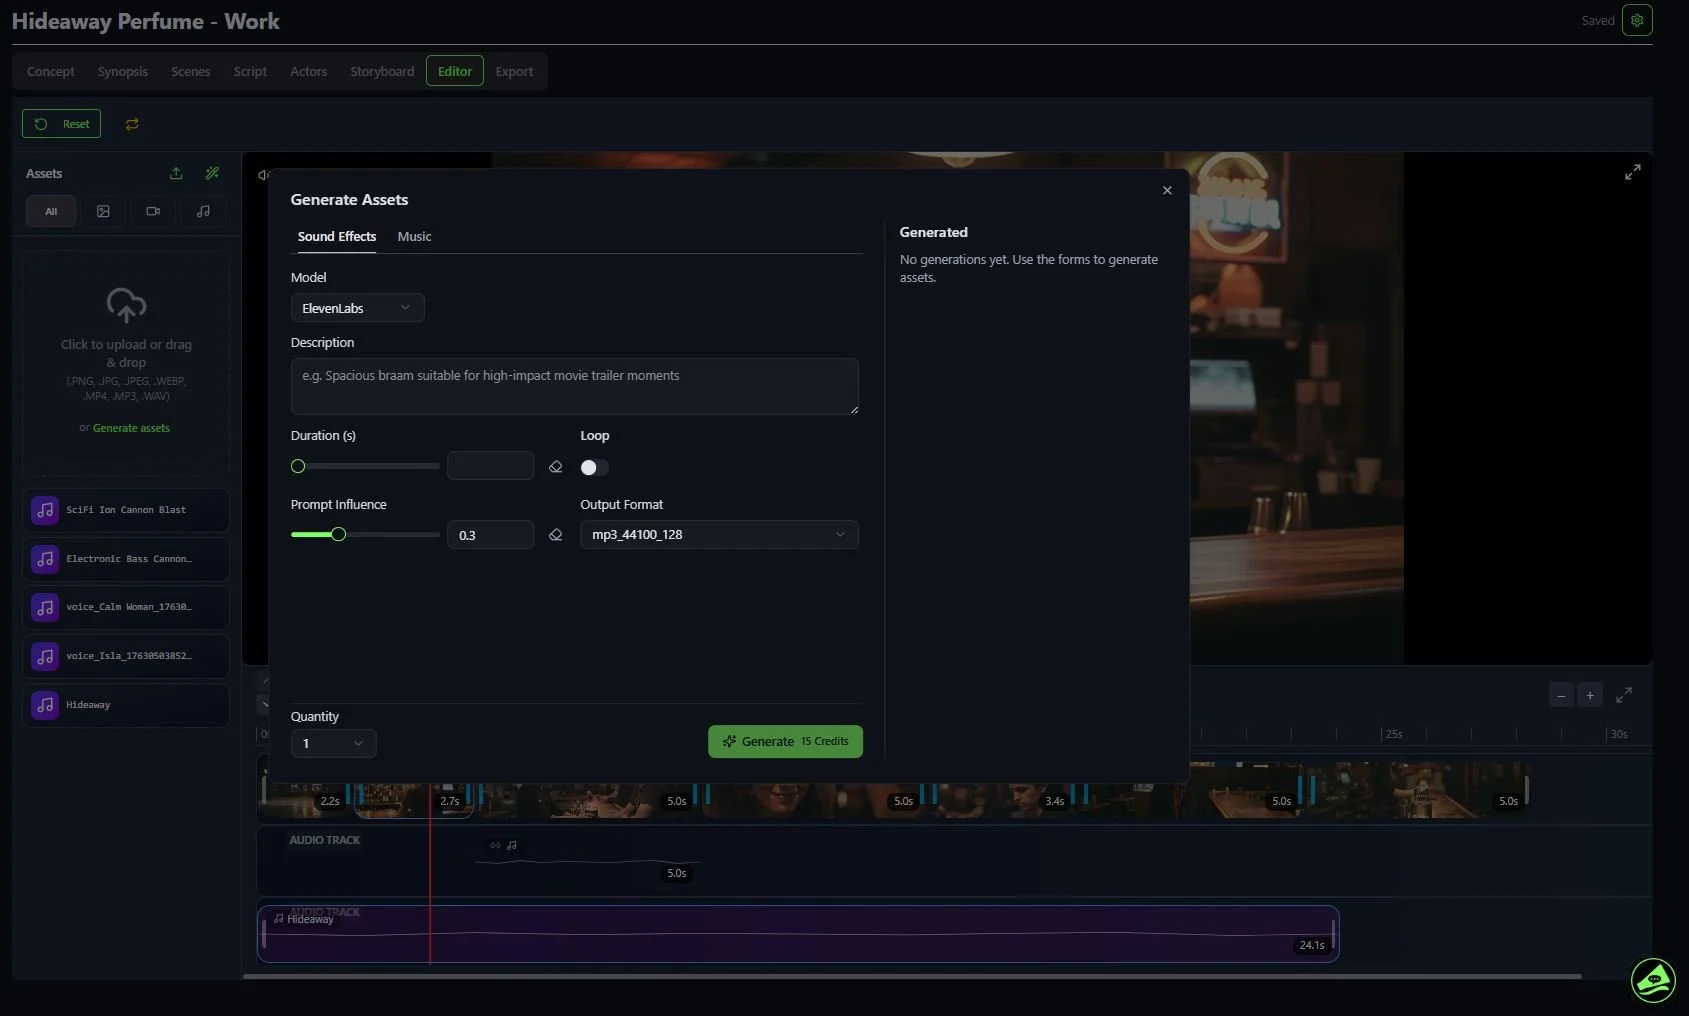
Generating Sound Effects
Model: Currently, there is only one model to choose from, Eleven Labs.
Description: In the Description field, describe the sound effect you wish to create.
Duration (s): Choose the number of seconds you want the sound effect audio to be. You can use the slider or enter in the number of seconds manually. You also have the option of resetting the duration, if needed.
Loop: This can be set to On or Off by clicking on the button next to Loop. Loop is primarily used to repeat a sound effect with a long duration.
Prompt Influence: This determines how much influence the prompt has over the sound effect that will be generated. A higher influence value ensures precision, sticking strictly to the description, which is ideal for specific, technical needs. A lower influence value introduces creative variation, allowing the model more flexibility to experiment with the sound's interpretation. By default, this value is set to 0.3.
Output Format: Allows you to select the output format of the sound effect being generated. There are many different options available.
Quantity: Select the number of sound effects you want to generate at once, with the same options and description. You can select from 1 to 4.
When you are ready to generate a sound effect, click on the green Generate button. Once the sound effect finishes generating, you can click on the Save All & Close button. This will add the sound effect clip into the right side panel. You will also see options to download the clip, edit the name of the clip and delete the clip inside of the clip window.
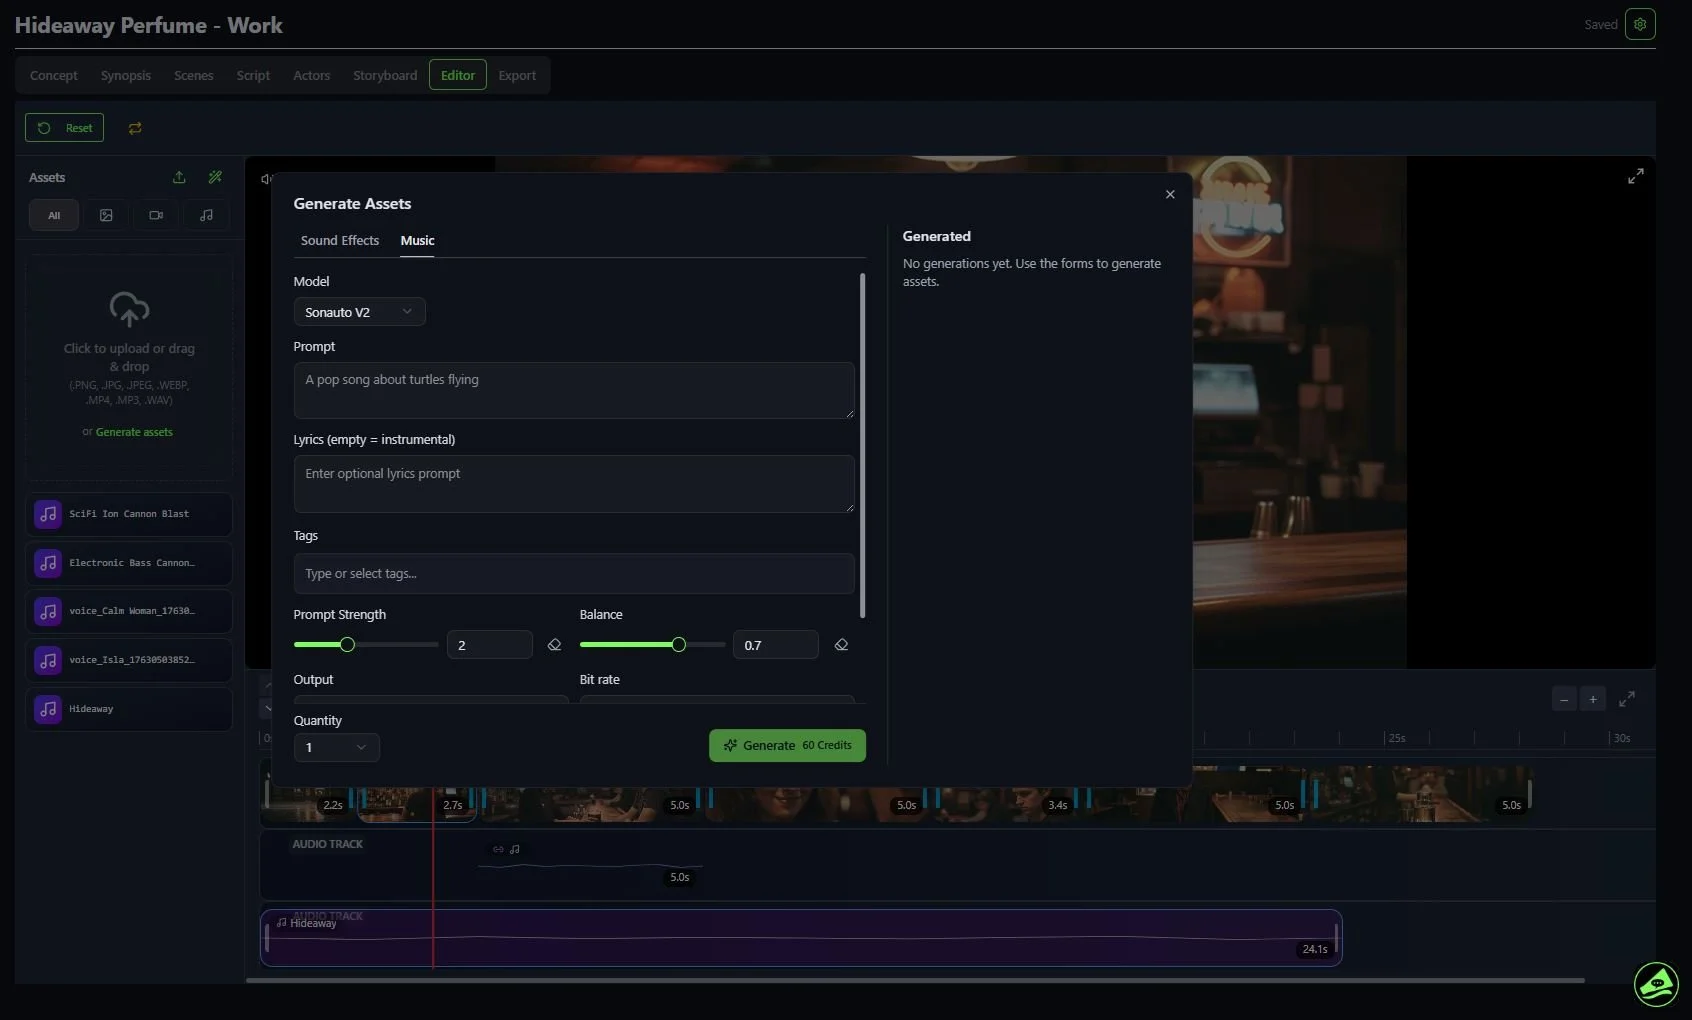
Generating Music
Model: Currently, there is only one model to choose from, Sonauto V2.
Prompt: In the Prompt field, describe the type of music you wish to create.
Lyrics: In the Lyrics field, enter any lyrics you want to be in the music track being generated. You can also leave this blank if you do not want any lyrics in the music track.
Tags: You can manually enter tags that describe the genre of music you want to create, or select from a robust list of choices.
Prompt Strength: This slider lets you choose how much you want the AI to match to the Prompt. A higher value will be more strict and have less creative influence from the AI. By default, this value is set to 2. You can also choose to enter a value manually by typing it into the field. There is also an option to reset the prompt strength back to the default value.
Balance: This is a technical parameter used to control the audio mix priority between vocals and instrumentation. We recommend using the default setting of 0.7 to achieve a stable equilibrium between these two elements.
Output: Allows you to select the output format of the music track being generated (e.g. .mp3, .wav).
Bit rate: Allows you to choose the bit rate of the music track being generated. We recommend leaving this on the default setting of “auto” for automatically, unless you want a specific bit rate for the music track.
BPM: This stands for Beats Per Minute. Entering a number value into this field will let you customize the number of beats per minute in the music track, so you can adjust the temp of the music track.
Seed: This controls the randomness in the music track being created. Providing a specific seed with the same prompt and settings will generate the exact same song, acting as a reproducible starting point.
Quantity: Select the number of music tracks you want to generate at once, with the same options and description. You can select from 1 to 4.
When you are ready to generate a music track, click on the green Generate button. Once the music track finishes generating, you can click on the Save All & Close button. This will add the music track into the right side panel. You will also see small buttons allowing you to download the music track, edit the name of the track and delete the track.
Once you have finished editing your movie, click Export.
Step 10: Export & Publish
Export
Export is where you download your movies in various formats. You can also download any individual image or video in your History. Read below for the various Export options:
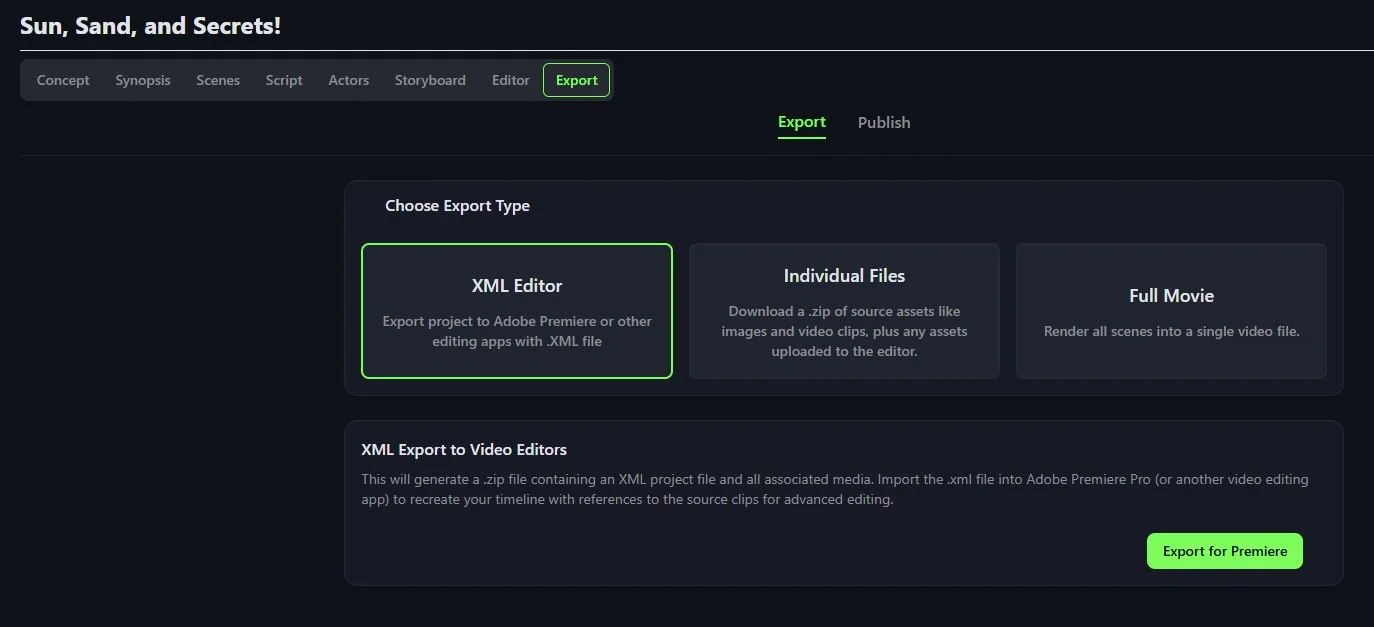
Choose Export Type - We currently offer three different options for exporting, XML Editor, Individual Files and Full Movie.
XML Editor - Export your entire project timeline including audio and any trims you made in the editor in .XML format for Adobe Premiere, Final Cut Pro or most video editing software.
Individual Files - Download a .zip of source assets such images and video clips.
Full Movie - Render all scenes into a single video file with hard cuts.
Publish
Publish allows you to create a Movie Poster and/or YouTube Thumbnail image
Movie Poster:
A 2:3 movie poster is generated when you enter the Export section in the Poster tab. Please note that the Image Prompt is not automatically created, so this must be done manually.
You also have the option of using an image from My Library or you can upload your own image for your poster. If you would rather generate an image for your poster, follow the steps below.
Select the image model you want to use to generate an image, and select the number of images you want to generate.
Add an Image Prompt. We recommend using the Generate Prompt button to automatically generate an image prompt for your poster image.
Select the Cover Image Actors from your story that you want to be featured in the poster image.
When you are ready to generate an image, click on the (Generate) Cover button.
YouTube Thumbnail:
A YouTube thumbnail image is generated when you enter the Export section in the Thumbnail tab. Please note that the Image Prompt is not automatically created, so this must be done manually.
You also have the option of using an image from My Library or you can upload your own image. If you would rather generate an image for your thumbnail, follow the steps below.
Select the image model you want to use to generate an image, and select the number of images you want to generate.
Add an Image Prompt. We recommend using the Generate Prompt button to automatically generate an image prompt for your Thumbnail image.
Select the Cover Image Actors from your story that you want to be featured in the thumbnail image.
When you are ready to generate an image, click on the (Generate) Thumbnail button.